By Santi, Head Van Engineer, March 11, 2026
The most important camper van upgrades focus first on reliable power, climate control that matches your use case, and basic safety systems for the van. A right-sized solar, battery, and inverter setup, better insulation and ventilation, and upgraded tires and suspension deliver the widest comfort, safety, and resale value for most owners. Smaller, focused installs like a compressor fridge sized to your power budget, a vent fan, and modular storage often give the best day-to-day use per dollar spent. In my experience working on dozens of builds, owners who start with these basics get the fewest surprises down the road.
Introduction - why choose upgrades carefully
Upgrades change how a van works on the road and how long it lasts. Choose installs that lift safety, freedom, or daily comfort first. High-cost, low-value items can sap payload and make upkeep harder.
- Right-sized electrical system – Lithium battery bank matched to your real daily use, an inverter sized to your peak loads, and solar/charging sources that can reliably refill your batteries. This is the backbone of most of the best camper van upgrades and high-value camper van modifications.
- Efficient compressor fridge – A 12V compressor fridge sized to your power budget and travel style. It draws far less power than absorption fridges and keeps food safe in hot weather.
- Roof vent fan and ventilation – A quality vent fan plus planned airflow paths. This controls moisture, keeps temps livable, and protects your build from condensation damage.
- Insulation matched to your climate – Thoughtful insulation and air sealing for the regions you actually travel in, not just maximum R-value. This helps your heating and cooling work efficiently.
- Upgraded tires and suspension – All-terrain or load-rated tires and improved suspension components for better handling, braking, and comfort on rough roads or in crosswinds. According to NHTSA tire safety guidance, properly selected and maintained tires are critical for safe handling and braking, especially under heavy loads.
- Basic safety systems – Fire extinguisher, CO and smoke detectors, propane detector (if applicable), and properly sized fuses and breakers throughout the electrical system.
- Modular storage and tie-downs – Flexible cabinets, L-track, and anchor points that keep gear secure while driving and make it easy to reconfigure the space as your needs change.
- Shore and alternator charging options – A shore power inlet with a quality charger and a DC-DC charger from the alternator so you can recharge whether you’re parked at a campground or driving between boondocking spots.
Start from your travel style, then size systems to match that use case. A staged plan, where you check each step against weight and electrical budgets, often beats one big all-in project.
How to decide which van upgrades are worth it

Make choices with three filters: mission (weekend trips, full-time living, overlanding), return on daily value, and technical impact (weight, electrical load, and GVWR). Focus on systems that cut ongoing friction: reliable power, comfortable climate control for your region, and durable undercarriage parts.
The Vansmith approach is to favor proven reliability over new and untested ideas. A quick rule of thumb is to ask whether the change saves you time, boosts safety, or cuts repeated effort when planning your camper van improvements.
Power & electrical systems (high impact)

Electric power is the base of your build. A system sized to your true daily draw prevents problems and lets you use comforts day after day.
Invest in good parts and correct install; poor wiring or too-small fuses creates safety and warranty risks (Family Handyman). In practice, a modest extra upfront cost on wiring and safety parts saves a lot of headaches later.
Sizing solar, batteries, and inverter (what to prioritize)
Put battery size first to meet night-time loads and inverter size for peak appliance draws (Victron Energy). For mixed weekend and longer trips, a common useful range is 200 to 400 amp-hours of lithium capacity. Pair that with a 1,500 to 3,000 watt inverter, depending on whether you run high-draw appliances.
Match panel area and charge gear to refill that capacity based on normal sun exposure (Renogy). Oversizing panels without matching battery size or wiring is wasteful, so size each part to fit the whole system rather than one number on its own.
Shore power, shore-charging and alternator charging
Shore power is the simplest way to recharge quickly at campgrounds; include a proper AC charger and shore inlet if you expect steady hookups. Alternator charging and DC-DC chargers are key for those who spend time driving between boondocks; these systems top off batteries while driving and cut reliance on long solar charge windows. According to AAA’s overview of alternator function, a healthy alternator and correct charging setup are essential when you’re relying on vehicle-driven charging for house batteries.
Installation safety and professional vs DIY
Small wiring tasks and add-on installs are fair for skilled DIYers. Anything that changes charging profiles, installs large lithium banks, or alters factory charging should be done by a pro. Proper fusing, wire size, and battery management systems matter for performance and fire safety; when in doubt, choose pro installation.
Climate control and comfort (high to medium impact)
Comfort is boosted most easily by insulation, passive airflow, and focused heating. These are lower weight and power than rooftop A/C and work for most weather.
Insulation and passive ventilation (fans, vent placement)
Good insulation and a good vent fan with careful placement give large comfort gains for modest cost and weight. Smart van insulation upgrades cut HVAC runtime and improve sleep temp, while a vent fan gives airflow control without heavy power draw. Pairing these with camper van solar panels or a lithium battery upgrade for campervan setups helps you run everything reliably off-grid.
Diesel heaters vs propane vs electric A/C, when each makes sense
Diesel or liquid-fuel heaters are compact, efficient, and ideal for cold-weather use where weight and power are limits. Roof A/C is high cost and power hungry. It is usually worth it only for full-time vanlifers in steady hot climates who can run it on shore power or a very large inverter and battery bank. For many users, insulation plus a small heater and smart parking choices gives the best cost-to-comfort trade-off.
Kitchen, food & water systems (medium impact)
Kitchen and water upgrades matter for daily ease but are highly tied to habits. Size appliances to match power on hand and storage needs when planning your camper conversion upgrades.
Fridge choices: compressor vs absorption vs thermoelectric
Compressor fridges are the best general choice for power use and temp control on battery power. Absorption units work well when you are often on shore power or driving, but they draw more and are less reliable off-grid. Thermoelectric models are low-cost and low-efficiency and are suitable only for very light use.
Water systems: tanks, pumps, on-demand hot water, and sanitation options
A modest fresh and grey tank with a reliable 12V pump covers most needs. On-demand hot water is a high-value comfort upgrade for longer trips but uses water and fuel. For many customers, a small dedicated hot-water heater paired with insulated lines gives the best balance of comfort and weight.
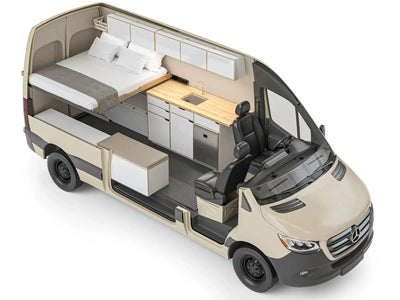
Storage, layout & daily usability (high impact for livability)
Smart layout often beats extra gear. Flexible bed platforms, modular storage, and drawers that make daily tasks quicker improve life in a van more than decorative finishes.
Bed platforms, modular furniture, and space-saving solutions
Put modular furniture first that adapts to many uses, sleeping, dining, and cargo. Simple, tough finishes and well-placed drawers increase usable space and lower upkeep over time.
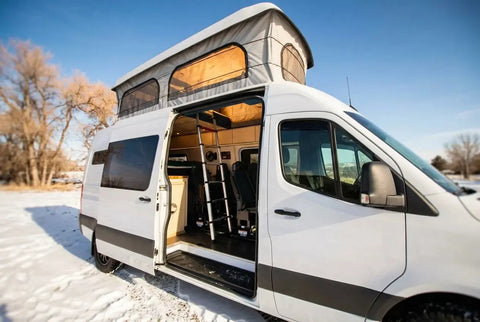
Roof racks, ladders, awnings, and cargo considerations (weight and drag)
Roof racks and awnings are useful but add weight and wind drag. Factor these into payload and fuel expectations. For roof loads, verify rack rating and keep in mind that every pound up there affects handling and GVWR limits. Vehicle makers like Ford’s Transit cargo van specifications and Mercedes-Benz Sprinter payload charts publish roof load and GVWR limits that you should stay within when adding racks and gear.
Vehicle & safety upgrades (critical but mission-dependent)
Safety upgrades protect you and protect your investment. These are key installs when you plan to carry heavier payloads or travel off-pavement.
Tires, suspension, brakes, and gross vehicle weight limits
Upgraded tires and suspension tuned for your payload improve safety and ride quality. If payload often approaches GVWR, invest in suspension upgrades or re-rate the vehicle as needed. Never ignore payload math; exceeding GVWR creates legal and safety risk. The National Highway Traffic Safety Administration emphasizes that overloading a vehicle can increase stopping distances and reduce stability, especially in emergency maneuvers.
Ready to plan the best camper van upgrades for your build? explore our services, browse our camper van conversion packages, or contact us to talk through a clear, high-value upgrade path.
Electrical safety, wiring, fusing, and code/regulatory considerations
Use right-size wire, fuse every branch, and protect battery banks with BMS and isolation. Certain upgrades may affect warranty or insurance; consult pros when changes alter emissions, chassis, or wiring layout. If you want to see how we implement these principles in real builds, explore our camper van conversion gallery for examples of finished electrical and safety systems.
Luxury or low-ROI upgrades, when to skip
High-cost luxury add-ons, excessive custom cabinets, oversized rooftop A/C for mild climates, and heavy decorative fittings often reduce payload and make maintenance harder. Skip these unless they directly support your daily comfort and mission.
Cost ranges, time, and who should install it (DIY vs pro)
Expect broad ranges: a useful solar, battery, and inverter system usually runs from a few thousand dollars to the high single digits installed, based on capacity. Insulation and ventilation are modest in cost but high in value. Suspension and brake work vary by vehicle and scope. DIY is reasonable for basic installs; professional work is recommended for high-capacity electrical, charging modifications, or anything affecting chassis safety.
Upgrade recommendations by van-use profile
Weekend warrior: modest battery, efficient compressor fridge, good vent fan, and modular storage. Adventure couple and full-timers: 200 to 400 Ah lithium, 1,500 to 3,000 W inverter as needed, robust solar array, diesel heater or shore-friendly A/C plan, and upgraded tires and suspension. Overlanding and off-grid: prioritize alternator charging, reinforced suspension, and lightweight durable storage solutions. If you’re not sure which profile fits you, our van build consultation service can help you match upgrades to your actual travel plans and choose the right camper van add-ons.
Conclusion, making a prioritized upgrade plan
Build a clear plan: start with electrical and safety systems, then address insulation and everyday comfort, and finally add mission-specific extras. Check weight and electrical budgets before buying. Talk with trusted service providers and reference van-service-and-upgrades guidance to align installs with real-world use.
A thoughtful, staged approach gives the most reliable and joy-filled van ownership. If you want help ranking needs for your specific van and travel style, reach out to a trusted shop or consultant to map a staged upgrade plan, or start by reviewing our camper van conversion options to see what aligns with your goals.
FAQ
What are the highest-value camper van upgrades?
High-value upgrades include a right-sized solar, battery, and inverter system; good insulation and venting; a compressor fridge matched to your power profile; and safety-related vehicle upgrades like tires, suspension, and brakes. These upgrades improve safety, independence, and daily comfort.
How much does a basic useful solar and battery system cost?
A solid mid-range off-grid system usually ranges from $2,000 to $8,000 installed based on part quality and system size. Higher-capacity lithium systems and larger inverters raise cost accordingly.
Is roof A/C worth it for a van conversion?
Roof A/C is worth it mainly for full-time vanlifers in very hot climates with steady shore power or very large battery and inverter systems. For many users, better insulation, a vent fan, and smart route choices provide greater comfort per dollar.