By Santi, Head Van Engineer, March 25, 2026
The camper van winterization checklist below gives a clear, useful sequence to protect plumbing, battery power, heating, and the van structure. It helps you travel safely and stay comfortable in freezing weather. It covers pre-season mechanical checks, wiring and battery plans, heating-fuel choices, plumbing choices (drain vs. antifreeze), insulation and moisture control, tires and chassis care, on-the-road practices, and a storage-focused checklist.
Follow the order here to focus on systems that fail first in cold weather and to keep long-term damage and costly repairs off the road. If you prefer, run through the checklist with a shop mechanic for a quick sanity check before a long trip or schedule a visit to our van service and upgrade shop for a professional winterization review.
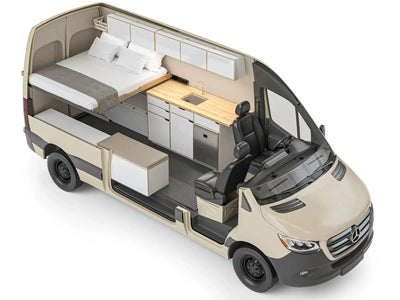
- Start with critical freeze-risk systems first. In your camper van winterization plan, prioritize anything that holds water (fresh, gray, black tanks, lines, fittings) and anything that keeps you warm (heaters, fuel lines, batteries). These are the first systems to fail when temps drop.
- Decide early: active winter camping vs. storage. If you’ll be using the van in freezing temps, focus on insulation, heat, and battery protection. If you’re parking it for months, focus on fully draining plumbing, stabilizing fuel, and protecting tires and seals.
- Protect your battery bank from cold-soak. Check wiring, fuses, and alternator health, then add insulation or heating pads for lithium batteries. Cold batteries deliver less usable power, so plan for extra capacity or charging time in winter.
- Choose a plumbing strategy: drain, antifreeze, or hybrid. For full storage, fully drain and blow out lines. For light winter use, consider RV antifreeze in traps and low points. For heavy winter use, combine partial draining with heated/insulated lines and tanks.
- Match your heater and fuel to your travel plans. Diesel heaters need clean fuel and anti-gel additives in very low temps. Propane systems need leak checks, regulator inspections, and enough venting to manage condensation.
- Control condensation before it becomes mold. Add insulation where you can, use vent fans even in winter, crack windows when cooking, and keep soft goods (mattress, cushions) off cold metal surfaces to avoid hidden moisture buildup.
- Inspect tires, suspension, and rubber parts for cold-weather stress. Check tire age and tread, torque lug nuts, and look for cracked bushings, hoses, and belts. Cold makes rubber stiffer, which changes ride and braking feel.
- Do a quick pre-trip winterization sweep before every long drive. Even after a full cold-weather camper setup, re-check fluid levels, visible wiring, heater operation, and any exposed plumbing before heading into a new cold snap.
Introduction: Why winterize your camper van?
Cold weather brings distinct failure modes for camper vans. Water lines and tanks can freeze and burst, battery banks lose usable power, heater fuel systems can gel, and moisture can wreck inside surfaces. Winterizing is the hands-on work of preventing those failures so your van remains functional and safe for overnight stays, remote travel, or storage. From experience, doing a short pre-trip sweep can avoid an otherwise costly repair down the road.
Risks of cold-weather travel (frozen plumbing, battery loss, condensation, mechanical stress)
Frozen fresh water or gray/black tanks will block systems and can crack plastic fittings. Batteries produce far less usable power as it gets colder (Battle Born Batteries), which raises the chance of being stranded. According to testing summarized by AAA winter driving and maintenance guidance, cold temperatures significantly reduce available cranking power and can expose weak batteries quickly.
Moisture during warm days and cold nights creates mold risk and speeds up rust and decay. In terms of how the van drives, thicker fluids and stiffer rubber parts change braking feel and how the suspension reacts; inspect these before long trips.
Who should winterize — full-timers, seasonal travelers, owners preparing for storage
If you plan to camp in temps near or below freezing, winterize for active use; full-time travelers need strong battery heat and steady hot water or propane heat. Seasonal owners who are parking for months should follow the storage checklist to avoid freeze damage and fuel breakdown. If you’re still deciding what kind of build you need for winter, explore our camper van conversion packages to see layouts and systems designed for cold-weather travel.
Pre-season mechanical and power checks

Engine and fuel system
Diesel vans need anti-gel fuel treatments for extreme cold and a clean fuel filter to cut clog risk. For gas engines, use a good fuel stabilizer if the van will be stored; otherwise keep tanks full to cut down moisture in the tank. The U.S. Department of Energy’s FuelEconomy.gov winter driving tips note that cold weather thickens engine and drivetrain fluids, which can reduce efficiency and make starting harder, so staying on top of fuel quality and oil changes matters more in winter.
Inspect belts, hoses, and heater lines for stiffness and replace any parts showing older cracking. A brief look under the hood can reveal worn rubber that turns into a problem only when temps drop.
Cooling system and antifreeze levels
Confirm the engine coolant is at the maker’s suggested strength for frost protection (AAA) and is set for the right number of degrees. Low or wrong-mix coolant is a common cause of freeze damage and head-gasket issues; have a shop test and top up if needed.
Charging system and alternator health
Voltage under load matters more in winter. Test alternator output and make sure charging settings are right for your battery type. Rusty cable ends and weak alternators show up as slow charging; fix these before relying on alternator-only charging in cold weather.
Battery and electrical winter prep

House vs. starter batteries: state-of-charge targets and cold-temperature capacity loss
Batteries can lose 30 to 50 percent of usable power at near-freezing temps (Victron Energy); keep a higher charge level (80 to 100 percent when you can) for reliability. Prioritize a battery-monitoring routine and carry a jump starter sized for your starter battery if boondocking in cold regions.
Battery heating, insulation, and relocation options
Think about using lined battery boxes, heated battery pads, or moving house batteries to a lined compartment. Heated battery boxes or a controlled box cut power loss and extend life. For customers, we offer battery upgrade and installation services like the EKKO Lithionics battery options that perform better under winter loads.
Charging strategies: solar performance in winter, generator use, shore power considerations
Solar output drops with lower sun angles and shorter days; avoid relying on solar-only charging for long cold stretches. Plan for generator access, shore power stops, or extra engine charging. According to U.S. Department of Energy guidance on electric vehicle operation in cold weather, reduced winter solar and battery performance are normal, so building in redundancy is smart for off-grid travel.
If using shore power, confirm the heater and battery chargers work on low-amp circuits. A quick rule of thumb: if you expect a few cloudy days, line up a backup charging plan.
Heating systems and fuel management
Types of van heating (diesel hydronic, propane furnace, electric heaters)
Diesel hot-water systems provide steady, efficient heat and are a top choice for off-grid winter use. Propane heaters are lighter and strong but need care with tank pressure and airflow. Electric space heaters are useful with shore power but draw heavy current; always check for safe wiring and CO detection when using combustion heaters.
Fuel safety and bunkering (propane handling, tank pressure, winter-grade fuels)
Store propane bottles upright and outside the cabin where you can. For diesel, winter-blend fuel or treatments prevent waxing and filter clogs. This is extra important for Mercedes Sprinter winterization and Ford Transit winterization, where diesel heaters and long fuel lines are common. Keep spare safe fuel and never run combustion heaters in closed spaces without good airflow and working CO detectors.
Ventilation and CO/safety detectors
Install and test carbon monoxide and propane alarms before winter use and replace batteries yearly. Maintain a vent plan to cut moisture buildup while keeping heat; use a low-draw vent fan or a short, regular airing routine rather than leaving vents fully open overnight. The National Highway Traffic Safety Administration warns that running engines or fuel-burning devices in enclosed or poorly ventilated spaces can lead to deadly CO buildup, so detectors and airflow are non-negotiable.
Plumbing, tanks, and winterization steps
Draining freshwater and gray/black tanks vs. keeping systems live
For storage, drain fresh water and holding tanks and add RV-grade propylene glycol anti-freeze into trap bowls and drains as recommended. For active winter use, keep systems live and use tank heaters, heat tape, and insulation to prevent freezing while keeping everything working.
Proper use of RV/propylene glycol antifreeze and where to apply it
Use food-grade propylene glycol RV anti-freeze in drains, traps, and holding tanks but avoid putting it into the drinking-water system unless you follow flush steps. Apply anti-freeze to low points and P-traps and run a set amount through fixtures per maker guidance.
Insulating pipes and holding tanks, tank heaters, and heat tape
Insulate exposed plumbing with foam sleeves, wrap tanks with heated blankets or install electric tank heaters, and secure heat tape with its own thermostat for weak spots. Insulation of the floor and under-tank areas cuts the load on active heating systems.
Insulation, windows, and condensation control for winter camper vans
Upgrading insulation (roof, floor, doors) and window coverings
Adding foam, wool, or lined panels to roofs, floors, and doors cuts heating load a lot. Use lined window covers at night to reduce radiant heat loss and moisture on glass. If you’re planning a full build or remodel to improve winter performance, browse our van build process overview to see how we design insulation and window treatments from the ground up.
Managing moisture: ventilation strategy, dehumidifiers, vapor barriers
Control moisture with a steady vent routine, small plug-in dehumidifiers when on shore power, and vapor barriers where moisture risk is high. Wipe down wet surfaces and dry wet gear outside the living area whenever you can.
Preventing and treating mold
Prevent mold by keeping indoor moisture low, airing out the van after wet activities, and checking insulation spaces for trapped water. Treat early signs with approved cleaners and fix the source, usually condensation or a slow leak.
Tires, brakes, and chassis considerations
Tire selection and pressure management in cold weather
Cold lowers tire pressure; check pressures when cold and carry a solid inflator. For frequent winter travel, use winter-rated tires that fit your van's load rating. Keep a compact shovel, traction mats, and chains where legal and needed for routes. The NHTSA tire safety guidelines emphasize checking pressure in cold weather and using tires with appropriate load and speed ratings for your vehicle.
Brake and suspension checks before long winter trips
Inspect pads, rotors, and suspension bushings; cold and salt speed up wear and rust. Clean and coat weak areas underneath if you often drive on salted roads.
On-the-road and campsite practices
Leveling and skirting for cold campsites
Level the van to help drain systems and cut cold pockets. Use skirt panels or windbreaks to cut moving air heat loss under the van when staying in one spot for long periods.
Safe generator and venting practices when parked
Run generators outdoors and downwind, and never run fuel-burning heaters without fresh air. Follow fuel and airflow rules closely to avoid CO buildup.
Nighttime routines to maintain heat and prevent freezing
Keep tanks insulated, move warm air to problem areas, and charge batteries before nightfall. Pre-warm water lines if possible and store a small supply of heated water in lined containers for quick use.
Storage winterization checklist (if putting van into storage)
Long-term battery care and storage charge schedules
Bring batteries to a full charge and maintain with a smart charger on a slow float schedule, or remove and store in a warm place. Check SOC monthly during storage.
Fuel stabilization, pests, and moisture control
Add fuel stabilizer, top off tanks, and use moisture absorbers inside the van. Seal openings to deter rodents and check now and then for signs of pests.
Tire care and lifting/rotation considerations
Inflate tires to the suggested storage pressure and think about lifting the rig or turning tires now and then to avoid flat spots for long storage periods.
Troubleshooting common winter problems
Frozen pipes and quick remedies
Slowly apply heat with a hair dryer or warmed towels to frozen sections and use lined heat sources to prevent re-freeze. Never use open flames; if a line has cracked, replace fittings and pressure-test the system.
Dealing with low battery capacity in cold snaps
Connect to shore power, run a generator, or use a heated battery box to restore power. Keep a good jump starter on board for emergencies.
Heating system failures — diagnostics and emergency fixes
Check fuel supply and filters for fuel-burning heaters, ensure start parts are working, and confirm proper venting. For electric heaters, verify wiring and breakers before swapping units.
Recommended tools, parts, and upgrades
Carry: compact shovel, traction mats, chains if needed by route, heated battery pads or lined box, small shop heater rated for RV use with CO alarm, spare filters, fuel treatment, food-grade RV anti-freeze, and a solid jump starter. Consider pro upgrades such as diesel hydronic systems, dedicated tank heaters, and a larger battery bank for frequent winter use. Our service offerings include heater install and battery upgrade options that address these exact needs, and you can see examples of cold-ready layouts in our camper van build gallery.
Conclusion and quick pre-trip winterization checklist
Focus on battery health, plumbing protection, and steady heat. Use the stepwise checklist above before leaving on a winter trip. Inspect engine and fuel, confirm charging and battery wrap or boxing, secure heating fuel and alarms, protect plumbing with insulation or anti-freeze, upgrade insulation and window coverings, and choose tires appropriate for conditions. If in doubt, consult a technician; our Heater Install and How to Insulate Your Van resources can help plan upgrades and service work tailored to your platform, or you can reach out directly through our contact page to talk through winterization options for your camper rig.
FAQ
What does winterizing a camper van mean?
Winterizing means getting mechanical, plumbing, electrical, and living systems ready to work safely and dependably in freezing temperatures. This includes draining or anti-freezing water systems, protecting batteries, making sure heat is enough, and preventing condensation and mold. In other words, it’s full cold-weather prep for your camper or adventure vehicle.
Can I use RV antifreeze in all parts of the plumbing?
Use only food-grade propylene glycol RV anti-freeze in drains and holding tanks; do not put it into drinking-water tanks unless you flush the system well afterward. Follow maker guidance for heaters and pumps.
How do batteries behave in cold weather and what can I do?
Battery power drops as temps fall. Keep batteries warm or wrapped, maintain a higher charge level, use heated battery boxes or moving them to lined compartments, and plan for extra charging via generator or shore power. If you’re planning a full electrical overhaul for better winter performance, our van electrical and battery upgrade services can be tailored to your rig and climate.
Do I need winter tires on a camper van?
Winter tires improve traction and braking in snow and ice; for frequent winter travel, winter-rated tires are strongly recommended. Always confirm load ratings and ask a mechanic for load-specific advice.
What quick emergency items should I carry on winter trips?
Carry a compact shovel, traction mats, chains if needed by route, jumper cables or a jump starter, extra warm bedding, and a small RV-safe heater with CO alarm. Pack extra food, water, and communication options.