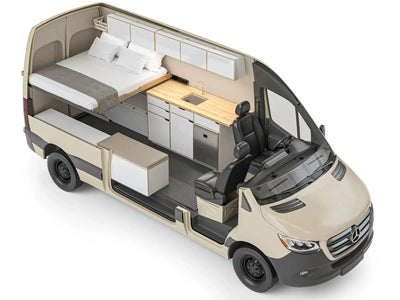
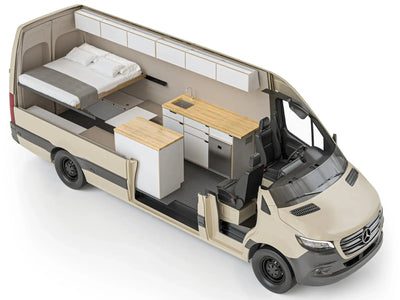
A good ski van setup usually starts with a fixed rear bed over a gear garage. That one choice shapes ski storage, wet-gear flow, heat, and winter water use. Which version works for you comes down to party size, ski length, and how much of your water system you expect to use below freezing. In real ski use, the best layout is the one that makes a 6 a.m. parking lot feel simple. Skis fit without drama, boots have a place to drip and dry, and the van stays warm where it counts.
Start with the decision: what kind of ski van setup are you building?
The first big call is simple. Do you want a fixed rear bed with a garage under it, or a more open floorplan that changes use through the day? For ski trips, that bed-over-garage choice tends to decide almost everything else.
That layout keeps long gear inside, gives wet items their own zone, and makes overnight ski use simpler. It also tends to support better drying flow than open layouts that ask one aisle to do everything.
Heat matters here too. According to FarOutRide's heater guide, a rear gear area that is fully cut off from the cabin can stay cold and damp enough to raise condensation and freeze risk. So heating is not just an appliance pick. It is a layout choice.
FarOutRide's winter vanlife guide keeps coming back to routine, and that matches what we see in our Boulder shop. A real ski van conversion needs to work through the whole day: load wet skis, peel off shells, dry boots, sleep warm, and still have usable water in the morning. Fancy storage means less if the routine feels clumsy.
In our builds, most ski-van buyers go with a bed-over-garage layout. It keeps pricey skis inside the van, moves wet gear out of the main aisle, and feels simpler for overnight parking than an exterior box in a snowstorm. After ski days, the features people use most are heater output aimed toward the gear zone, wipe-clean flooring by the door, and easy bins or trays for boots and snow-melt.
For buyers who do not want to start from a blank page, The Vansmith's ready-to-drive Bivy models and semi-custom platforms give you a shorter path. Our semi-custom builds usually take 8 to 10 weeks. Pages like Customize your van and Our process help show how those choices get made before the build starts.
Why the garage bed layout dominates ski use
The garage bed layout keeps showing up for a reason. It creates tall cargo space under the bed. That space is what lets long gear live inside without taking over the cabin.
Once skis, poles, shells, and skins come in covered in snow, separation matters fast. A below-bed garage keeps that mess away from bedding and seating. It also gives you one zone that can be wiped out at the end of the day instead of chasing meltwater through the whole van.
FarOutRide also notes that in very cold weather, the rear garage should not be fully cut off from cabin heat. Some heat transfer helps reduce humidity and helps keep things from freezing. Not always.
In our experience, bed height is one of the most important ski-specific choices in the whole van. Set it too low and skis only fit diagonally, or you end up raising the platform later. Set it too high and the living area starts to feel less comfortable every single day.
For couples, a Duo-style layout is usually the cleanest answer because it leaves a simple rear cargo zone under the bed. You can see the shape of that idea in our vans for couples collection and the DUO XL layout. As of 2026, the Duo starts at $114,450 in Sprinter form and $112,450 in Transit form.
What a ski-focused family layout changes
Family ski vans add a different kind of pressure. It is not just ski length anymore. Now you have four sets of boots, helmets, gloves, and wet layers, and a setup that feels roomy for two can feel overloaded by dinner.
That is where an indoor shower or enclosed wet zone starts to make more sense. In Winnebago's cold-weather gear guide, the bathroom is framed as one of the best drying spots because the surfaces are water-resistant and there is a drain. For a family, that can keep the rest of the van from turning into a drying rack.
In our shop, family ski customers use enclosed bins and clear kid gear zones far more than open shelves. Mixed wet gear spreads fast in a heated van, especially once gloves and neck gaiters start getting tossed around. A labeled bin is boring, but it works.
The trade-off is real. More bunks and more cabinetry usually eat into the clear rear garage space you would otherwise use for skis, avalanche packs, and drip trays. That is why winter use needs to come up early in the design chat, especially if you are looking at family vans or the Family XL layout.
As of 2026, the Family starts at $119,450 in Sprinter form and $117,450 in Transit form. That sounds like a lot of money for a bed. It is. But in a family ski van, you are really paying for storage flow, sleeping space, and a cabin that still works after four people come in soaked.
| Layout | Sprinter starting price | Transit starting price |
|---|---|---|
| Duo | $114,450 | $112,450 |
| Family | $119,450 | $117,450 |
The price gap buys you more sleeping and family-ready storage options, but it can also shrink the easy ski garage that couples enjoy. Big difference. Winter families usually do better with purpose-built zones than with just more cabinets.
Ski storage dimensions: will your skis fit across the garage?
This is the part a lot of people miss. The key number is not total cargo width. It is width between the wheel wells, because that is the first hard limit for floor-level crosswise storage.
Many vans have much less width between the wheel wells than their full cargo width suggests. Full-length adult skis usually do not fit straight across the floor at that point.
Even full interior width can still fall short for many adult skis if you want true side-to-side storage. In practice, most skis end up stored lengthwise, diagonally, or in raised side channels above wheel-well height. That is why brochure width can fool people.
In our builds, we tell customers to measure their longest ski pair, not the pair they use most often. Powder skis, touring skis, and growing kids all have a way of breaking the original plan. Snowboard van storage is easier in some ways, but wet bindings and stacked boards still need drip control and airflow.
The other part is access. A garage that technically fits skis but makes you unload half the van before dawn will feel wrong almost right away. If you are still weighing base platform size, our Sprinter conversions and Transit conversions pages are a good place to compare the kinds of layouts that support long-item storage well.
How to think about ski length versus garage geometry
Wheel-well width is the hard stop for sideways floor storage. So any plan that depends on skis fitting crosswise at the lowest point needs real chassis dimensions before cabinets get drawn. Bare shell numbers matter, but finished build numbers matter more.
Above the wheel wells, you gain useful width. That is why raised trays or shelves can open up better ski storage options. That extra space can be the difference between a clean lane and a diagonal jam.
We often solve this with slide trays, side cubbies, or dedicated ski lanes under the bed. What we try not to do is promise side-to-side fit that disappears once insulation and wall finish go in. Inches go fast in a van.
Snowboard van storage can use vertical stacking to save floor room, but only if the bindings do not snag bags, heater ducts, or water lines near the rear doors. This is where use beats math. The best storage is the one you can load with gloves on, in the dark, while snow is blowing in.
Storage details people appreciate after the first storm
Tie-down points matter more than they seem on paper. Secure gear-garage storage and tie-down function show that this is a mainstream winter need, not a niche add-on. Loose skis and poles sliding around get old fast.
Rear utility access also shows how the garage often becomes both gear bay and systems zone. That shared use is common in winter vans. It means storage needs to stay clean and reachable.
In our shop, ski customers usually like smooth, wipeable garage surfaces and removable bins more than fixed cubbies. Snow, grit, and pine needles pile up fast in winter. A bin you can pull out and dump is often better than a pretty built-in pocket.
Dedicated trays for skins, boot bags, and avalanche tools help keep meltwater out of bedding and cabinet toe-kicks. Rear-door access helps too, because it lets you load long gear outside the sleeping area. People rarely regret adding one more protected long-item lane for skis or poles, but they often regret underestimating helmet and layer volume.
Boot drying and wet-gear workflow matter more than extra cabinets
A lot of winter layouts chase more storage. Most ski users need better drying instead. Heat, airflow, and drip control usually do more for daily comfort than another row of tiny cabinets.
FarOutRide reports that wet gear can dry in about 1 to 3 hours when it hangs on a clothesline between the heater outlet and the roof fan in its winter vanlife guide. That is one of the most useful real-world numbers in this topic. Warm air helps, but moving moist air out of the van is what makes the system work.
Winnebago says the bathroom can be an ideal drying spot because waterproof walls and a drain keep drips contained, and it also recommends mats or trays for cold-weather gear control in its cold-weather RVing guide. That gets to the real issue. The problem is often managing water inside a warm van, not just making gear hot.
We see three wet-gear features get used over and over: a spot to sit while changing, a contained boot zone near heat, and a simple place to hang gloves and shells overnight. By contrast, tiny segmented storage for every winter item tends to go unused once everyone's hands are wet and cold. Fast beats clever.
If you are planning upgrades instead of a full build, this is also where a strong base matters. Our Foundation builds and articles in the van build blog are useful references for how layout and system choices start to stack together.
The fastest drying setups for boots, gloves, and shells
A heater outlet aimed near a hanging zone can turn the aisle or garage edge into an active drying path. Pair that with roof-fan exhaust and you get the same setup FarOutRide uses for its 1 to 3 hour drying window. It is simple, but it works.
The clothesline example matters because it builds airflow into the layout from day one. Drying should not be an afterthought. If the van has a shower, that space can double as a drip room for shells and skins because the drain already solves the messiest part.
We usually place the main boot zone where it gets some heat but does not block nighttime movement. Boots left in the aisle become a trip hazard and a wet spot at the same time. Drying also works better when liners, gloves, and shells can be spread apart instead of piled together.
A tray or mat under the boot area keeps salty meltwater off finished flooring and cabinet bases. That sounds minor until you see what one storm weekend can do. Then it feels obvious.
Where wet gear should live overnight
FarOutRide warns against fully isolating the rear garage in very cold weather because damp gear can stay cold enough to raise condensation and freeze risk. That lines up with what we see. Skis can stay cold in the garage, but boots, gloves, and shells need more warmth and airflow if you want them usable by first chair.
Wet gear storage and drying should be a dedicated zone, not just leftover space. That is the right mindset for a camper van for skiing. A split workflow usually works best.
Hard goods like skis and poles do well low in the garage. Soft goods like boots and gloves do better closer to heat and moving air. Customers who try to dry everything in upper cabinets often end up with stale, damp pockets that are harder to wipe down later.
This is one of the clearest cases where layout beats size. A smaller van with a smart wet-gear plan can feel more winter-ready than a bigger van with nowhere practical to dry gear. Worth remembering.
Heating for trailhead overnights: keep people warm and the garage usable
For winter camping, steady heat matters more than headline output. Diesel air heaters are one of the most common solutions, and FarOutRide's Espar guide is built around that use. They give you cabin heat without shore power, which is a big part of trailhead life.
But heat planning should include the rear gear area too. A very cold garage can trap condensation and can expose nearby plumbing or stored liquids to freezing. So the heat map of the van matters almost as much as the heater itself.
Strong insulation, protected tanks, and winter-focused plumbing all work together. That shows how heat and water protection are linked. One system affects the other.
In Boulder service work, ski customers care a lot about quiet heat that stays stable through the night. Broken sleep is what makes a winter van feel unusable. Heater upkeep matters almost as much as heater choice, because a neglected fuel heater is one of the fastest ways to lose trust in your setup.
What people really want is simple: warm sleep, a decent place to dress in the morning, and boots that are not frozen by dawn. If you are looking at winter upgrades, our Contact us page is the best next step for heater service, winterization work, or layout changes tied to ski use.
Why garage heat transfer matters in a ski van conversion
FarOutRide says that in very low temps, the garage may need some heat transfer to help prevent freezing and cut humidity and condensation. That means a sealed ski locker can backfire. It may hide the mess, but it can also trap the problem.
We usually aim for controlled heat bleed into the gear area instead of trying to make the garage as warm as the bed zone. That keeps the space usable without wasting comfort where you sleep. It also helps nearby tanks, lines, or valves avoid the coldest pockets.
Heater duct placement matters here. Air should move through the space, not blast into a pile of soft gear where flow gets blocked. In ski use, the garage acts like a mudroom, sports locker, and systems room all at once.
If water lines or valves share space with ski gear, they also need impact protection. Skis, poles, and bins get shoved around when people are tired. A good layout plans for that rough use from the start.
What actually gets used on cold ski nights
FarOutRide's winter guide keeps pointing back to habits like active drying, ventilation, and selective winterization. That is a useful reality check. Hardware matters, but repeatable routine matters too.
In our builds, the most-used winter features are easy-to-reach heater controls from bed, insulated window covers, and a simple way to crack ventilation without soaking the cabin in condensation. A warm seat edge or step-in zone by the side door matters too, because that is where people strip layers and knock off snow.
Customers use extra heat less as a luxury than as a drying tool for boots, gloves, and damp shells. Complicated nighttime conversions do not stay fun very long. Layouts that need you to move gear, fold beds, or reroute boots every night tend to wear thin fast.
That is why fixed, ready-to-sleep layouts keep winning for ski use. You come in cold, you want a place for gear, and you want bed to already be bed. Simple counts.
Four-season water systems: what stays usable below freezing
A four-season ski van conversion is usually not a promise that every hose and outside fixture works all winter. It is usually a selective winter-capable system. Core water stays protected, and the most exposed parts get drained when needed.
FarOutRide put its gray tank inside the van because freeze protection mattered for winter ski use, and its water system guide notes that rear and exterior water parts are more freeze-prone because they sit farther from heat. Its newer water install article also shows a split setup: one main fresh tank for year-round use and one 3-season tank that gets drained when needed. That is a practical model.
Production winter vans also show the same pattern, with protected freshwater access, heated tanks, and winterization features. Meanwhile, RVIA advises owners to follow model-specific winterization guidance and use care with holding-tank dumping in freezing weather. So even winter-ready systems still need owner attention.
In our experience, ski-van owners use winter-capable fresh water much more than exterior showers in cold months. That is why it often makes sense to protect the sink and hand-wash system first, then treat outside wash points as seasonal. Keep the core simple. Everything gets easier.
The smartest winter plumbing choices
Interior tank placement cuts freeze exposure compared with exterior or underbody placement. That is why FarOutRide chose an interior gray tank for winter use. Protected tanks start with protected location.
The split-capacity approach also makes sense in real life. One protected fresh tank can stay live through winter, while another tank gets used only in milder weather. That gives you water without forcing every circuit to be winter-ready all the time.
Heated fresh and gray tanks show the other path. If tanks cannot rely on cabin warmth alone, active freeze protection can help. Both approaches work, but both need the layout to support them.
We like drains, valves, and service points to stay accessible without unloading the entire ski garage. Winter fixes happen in gloves, in bad weather, and often in the dark. A winter-capable sink and hand-wash setup usually gives more day-to-day value than trying to keep every shower or exterior spray line active.
What to winterize anyway
Even FarOutRide still winterizes some vulnerable parts in a winter-oriented van, especially exterior shower or bike-wash components. That is an important reality check. Winter-capable does not mean nothing ever gets drained.
RVIA makes the same broader point by urging caution with tank dumping in freezing conditions and by pointing owners back to model-specific winterization steps. Some parts are just more exposed than others. Exterior wash stations and far-rear plumbing branches are usually the first things owners stop using in deep winter.
We also find that easy winterization access matters more than theoretical capability. If a bypass valve or drain is buried behind skis and boot bins, people are less likely to use it the right way. For ski vans, the honest goal is a protected core water system with quick seasonal shutoff for the most exposed parts.
FAQ
What is the best ski van setup for most couples?
For most couples, the best ski van setup is a fixed rear bed over a gear garage. It gives you protected ski storage, a separate wet-gear zone, and room for heat and winter plumbing to work together. That same formula shows up again and again in winter-focused vans because it solves the real daily problems well.
Can skis fit sideways in a camper van garage?
Usually not at floor level. Width between the wheel wells is often much narrower than full cargo width, so full-length adult skis usually need to go lengthwise, diagonally, or above wheel-well height. That is why garage geometry matters more than a single brochure width number.
How do you dry ski boots and gloves in a ski van conversion?
The fastest method is warm moving air plus a place for meltwater to go. FarOutRide says wet gear can dry in about 1 to 3 hours when it hangs between a heater outlet and a roof fan, and Winnebago notes that a bathroom or wet bath works well because the surfaces are waterproof and drained. In short, heat alone is not enough. Airflow and drip control do the rest.
Do you need heated tanks for a camper van for skiing?
Not always. You do need a winter-focused plumbing plan. FarOutRide chose an interior gray tank for freeze protection, while some winter-ready vans use heated fresh and gray tanks plus winterization features, so there is more than one way to keep water usable in cold weather.
Is a ski van conversion really four-season?
It can be winter-capable, but that does not mean every water feature stays live in every freeze. FarOutRide still winterizes vulnerable exterior water parts, and RVIA advises owners to follow model-specific winterization steps and use care with holding tanks in freezing weather. For most ski users, the real goal is a reliable core system, not every feature all winter.
About the author

Santiago Pere
Chief Design Engineer
Santiago is Chief Design Engineer at The Vansmith. He writes on topics spanning van design, builds, and life on the road.
Read more about Santiago