By Santi, Head Van Engineer, February 21, 2026
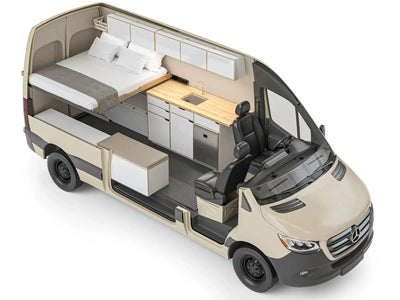
Quick overview, how a camper van solar electrical system works

A camper van solar power system evens out three power sources and the places that power is used. Solar panels with a charge unit harvest sunlight into the house power bank. The van charging system can top those cells while driving, best through a controlled charger. Modern vans like the Transit and Sprinter are designed with alternator outputs sized primarily for OEM loads and the starter battery, not continuous high-output auxiliary charging, which is why manufacturers such as Ford and Mercedes-Benz emphasize proper upfitter integration for additional electrical equipment.
Last, a power converter and DC loads draw energy for lights, pumps, fridges, and gear. A simple rule for any camper van solar system is sun power first during the day, power banks sized for your needs, and engine help as a steady backup.
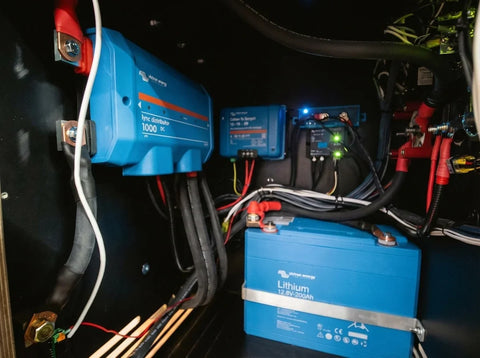
Key components: solar panels, charge controller, house battery bank, alternator, inverter, DC loads
- Solar panels - roof-mounted generators of DC power.
- Charge controller - usually MPPT; maximizes the energy sent to the battery.
- House battery bank - stores energy; chemistry determines usable capacity and weight.
- Alternator / DC-DC charger - supplies current while driving and manages charge profile.
- Inverter - converts 12V DC to 120V AC for shore-like appliances.
- DC loads - lights, fans, pumps, fridge, and charging ports; these drive your sizing decisions.
Energy flow scenarios - daytime, nighttime, and driving modes
Daytime: solar powers DC loads first, then fills the power bank. Nighttime: solar is off and power banks supply DC and power box loads until your planned discharge level is reached.
Driving: the engine charger can add charge, but best practice is routing its output through a DC-DC charger. That way the house bank gets the right step-by-step charge without straining the unit. In a well-built 4x4 camper van solar setup, think of this charger as a backup top-up rather than the main energy source for long-term off-grid use. According to guidance from the National Highway Traffic Safety Administration (NHTSA), any aftermarket electrical work should be designed so it does not compromise OEM safety systems or overload factory components.
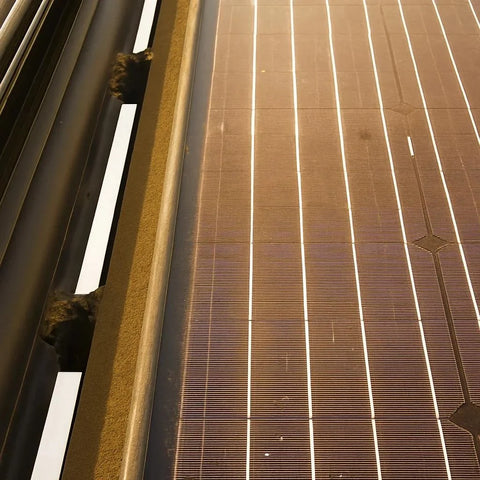
Panel types (monocrystalline vs polycrystalline vs flexible) and mounting considerationsMono panels provide the best power per square foot and are the default choice for most builds. (Renogy) Soft panels save weight and bend to curved roofs but often offer lower output and shorter life. Mount where shade is low, keep runs short, and use a low, slim rack on Sprinter or Transit roofs when you can. If you’re planning a full build, it’s smart to think about how your panels will integrate with roof accessories like fans and racks on a complete camper van conversion or 4x4 adventure rig.
MPPT vs PWM controllers - why MPPT is usually best for vans
MPPT units pull more power from the same panel area (Victron Energy), mainly under partial shade or higher panel power levels. For small roof area and higher-cost power banks, MPPT is the clear choice.
Sizing solar panels for typical van energy budgets (examples: weekend, full-time)
Begin with your daily amp-hour use at 12 volts. Typical budgets:
- Weekend rig (lights, phone, small fridge): ~100-150 Ah/day.
- Part-time full-timer (fridge, lights, pump, heater controls): ~200-400 Ah/day.
Quick rule of thumb: expect about 3–5 usable amp-hours per rated watt on a normal solar day for roof panels. Use that to guess needed panel watts and put MPPT and power bank size first when roof space is tight on a Mercedes Sprinter 4x4 adventure van or Ford Transit 4x4 camper build. If you can, track a few days of real use and compare to your guesses before locking in panel size. EPA efficiency estimates for full-size vans, such as the Transit and Sprinter, typically fall in the mid-teens MPG range in combined driving (fueleconomy.gov), so planning solar and battery capacity to reduce idling and generator use can also help cut fuel consumption. If you’re still deciding on a platform, looking at real-world layouts in a camper van build gallery can help you visualize how much roof space you’ll have for panels.
Batteries for camper vans - chemistry, capacity, and lifecycle
Lead-acid (flooded/AGM/Gel) vs lithium (LiFePO4) - tradeoffs
AGM and other lead batteries have lower upfront cost but are heavier and offer less usable storage before cycle life wears out. LiFePO4 campervan lithium battery setups cost more at first but provide far higher usable storage (about 80–90%), better charge take-in, lighter weight, and a much longer cycle life. (Battle Born Batteries) Independent testing summarized by organizations like the RV Industry Association (RVIA) and major battery manufacturers shows lithium iron phosphate can deliver several thousand cycles at typical camper-van depths of discharge when properly charged and managed.
About 90% of our clients choose high roof vans and plan for serious off-grid use with a full solar system for Sprinter van or Transit platforms. Because of that, we suggest LiFePO4 for most overland van builds where budget allows, especially when we’re installing a complete electrical package as part of our custom van conversion services for 4x4 camper rigs.
How to calculate required battery capacity (Ah) using autonomy and depth-of-discharge
Figure out daily Ah use, choose days of backup (1-3 days is common), then divide by usable depth of discharge. For example: 200 Ah/day x 2 days backup ÷ 0.8 usable = 500 Ah LiFePO4 bank. An AGM bank with ~0.4 usable would need about double the rated size for the same usable energy and will be heavier.
Battery charging stages and charge profiles - why correct charging matters
Correct charge stages (bulk, soak, float) extend battery life. Lithium needs limited current in bulk and a set soak/stop point; lead-acid gains from a proper soak stage to prevent sulfation. Programmable controllers and DC-DC chargers matched to battery type are important.
Alternators and charging while driving

How vehicle alternators charge house batteries - limitations and risks
Stock alternators are built for the van’s power system and starter battery, not steady high current charging of a large house bank. Connecting a large bank straight in risks overheating the alternator and can pull too much current when batteries are deeply discharged, especially a problem with LiFePO4. Automotive testing reported by publications like Car and Driver shows that alternators are designed around intermittent peak loads and sustained high-output operation can significantly shorten component life if cooling and current limits are not respected.
DC-DC chargers (B2B) and isolators - advantages over direct alternator charging
DC-DC chargers provide step-by-step charging and limit current to protect the alternator while giving the right profile for the house bank. Simple isolators or voltage-sensing relays do not control charge profile and are not suggested for lithium banks.
Upgrading alternators and thermal considerations for prolonged high-current charging
If your use case has long, high current charging on long drives, think about a stronger or extra charging unit and better heat control. That upgrade lowers charging system strain and supports faster refill of the house bank. When we design 4x4 camper van builds, we often pair alternator upgrades with robust lithium banks and solar so the whole system works together on your off-road adventure vehicle.
System integration and best practices
Prioritization logic (solar first, battery health, alternator assist) and charge controllers/BCMS
Design the system so solar feeds loads and batteries during daylight. Use battery care and adjustable charge units to preserve cell health. Alternator help should be extra and routed through a DC-DC charger that fits the battery type.
Wiring, fusing, battery monitoring, and ventilation/safety
- Right-size conductors and fuse at the source. Protect PV inputs and alternator/DC-DC inputs independently.
- Install a battery monitor or shunt to measure true amp-hours in and out, voltage alone is misleading.
- Secure and ventilate battery banks as required by the chosen chemistry; LiFePO4 is tolerant but still needs proper mounting and a BMS.
Example system builds for common budgets and use-cases
- Weekend build: 200-400 W solar, 100-200 Ah AGM or 100-200 Ah LiFePO4, MPPT controller, basic DC-DC charger.
- Part-time full-timer: 400-800 W solar, 300-500 Ah LiFePO4, MPPT, and a programmable DC-DC charger or alternator upgrade.
Troubleshooting and maintenance
Common problems (undercharging, sulfation, alternator overheating) and diagnostics
- Undercharging - check for shading, controller errors, or voltage drop in wiring.
- Sulfation on lead-acid - ensure occasional full charging cycles or consider replacing with LiFePO4.
- Alternator overheating - confirm DC-DC charger limits and inspect alternator cooling and mounts.
Maintenance checklist and seasonal considerations
- Inspect wiring, terminals, and fuses seasonally and verify charge profiles.
- Keep panels clean and clear of debris to maintain output.
- Monitor battery health with a shunt-based monitor and schedule service if capacities decline.
FAQ
How much solar do I need to run a camper van off-grid?
Size panels to refill your daily Ah use using roughly 3-5 Ah per watt as a starting rule, then pair that with power banks sized for your planned days of backup on your camper van or 4x4 overland rig.
If you’d like help planning a solid off-grid van solar system for your build, contact us to talk through options that fit your travel style or to get guidance on pairing your solar with the right camper van battery setup. You can also explore our turnkey van conversion packages if you’d rather have our team handle the full electrical design and install.
Can I charge my house batteries from the vehicle alternator while driving?
Yes, but do it through a DC-DC charger rather than direct wiring. DC-DC chargers provide safe step-by-step charging and protect the alternator and battery bank.
Should I choose AGM or LiFePO4 batteries for my camper van?
LiFePO4 offers far more usable storage, lower weight, and longer life. For most owners who value off-grid use and long life, LiFePO4 is the better long-term buy, especially in a 4x4 or AWD cargo van build that’s designed for extended boondocking. If you’re shopping for a ready-made rig, compare how different camper vans for sale are equipped from the factory in terms of battery chemistry and capacity.
Do I need an MPPT charge controller for a van solar system?
MPPT is suggested for small roof area and changing weather because it pulls more energy from the panels than PWM units, which is especially helpful on compact roofs like a Ford Transit medium roof or similar platforms.
What is a DC-DC charger and why is it suggested over a simple isolator?
A DC-DC charger controls step-by-step charging, limits alternator current, and gives the right profile for the house battery. Simple isolators cannot manage charge profile and are not a good fit for lithium banks, particularly in 4x4 conversion builds that see long highway days and heavy electrical loads in an off-grid adventure vehicle.
How do I prevent alternator damage when charging large battery banks?
Use a DC-DC charger with current limits, think about a second or stronger charging unit for heavy charging needs, and avoid long high current draws from a stock charging unit. For complex systems, it’s smart to follow camper van electrical safety best practices or work with a professional installer. If you’d like our team to design and install a complete electrical package, you can start the process on our van conversion services page.
Ready to design your system? Contact The Vansmith to schedule a free consult and get a custom quote for panels, power bank type, and charging plan, or explore how a full Sprinter van conversion budget might look with a robust off-grid electrical package for your 4x4 adventure rig. If you prefer to buy something that’s already road-ready, browse our current camper vans for sale inventory to see builds with dialed-in solar and battery systems.