By Santi, February 20, 2026
Introduction - expert vs DIY expectations


When you hire a expert to design and install a camper van electrical system you’re paying for trust, safety, and easy service. A pro install is more than a pile of parts. It’s a 12V-first layout with logged wiring, marked layout, proper-sized protection (Victron Energy), and startup tests.
Those tests ensure the system works as expected on day one and years from now.
DIY builds can be great for learning, but buyers should expect a expert installer to hand over a complete system that’s easy to service and clearly logged. We see owners value the gap most when a simple fault can be found quickly rather than turned into a weekend project.
What buyers should expect from a pro install
- Clear documentation: wiring diagram, component list, and simple troubleshooting notes.
- Accessible service points: shunt, bus bars, main fuses, and vendor-friendly component placement.
- Safety-first wiring: correct wire sizing, short-run routing, and fuses placed at the source.
- Commissioning: load tests, charge-source verification, and written sign-off.
Overview of a 12V-first architecture and why it matters
A 12V-first design puts DC loads first and keeps AC as a backup path. That cuts power-converter run time, makes wiring simpler, and boosts how well lighting, pumps, fans, and USB power work.
Pros design the system so common loads run straight from DC power and only high-draw or less-used gear use the power converter or shore power. This setup often makes daily use simpler and more effective.
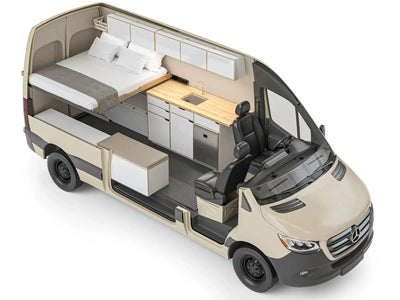
Core electrical components for a van electrical system

Battery bank - lithium vs lead-acid (performance, lifecycle, cost, safety)
Most expert builds today default to lithium because it gives higher usable storage, longer cycle life, and much lower weight (Battle Born Batteries). Expect builders to size lithium banks to the owner’s use rather than guessing.
Lead-acid (AGM or flooded) remains an option for budget builds, but pros will call out the downsides. You’ll need a bigger bank for the same usable amp-hours, accept shorter life, and plan on more frequent swaps. Safety steps and proper box airflow differ by battery type and must be part of the spec.
Battery Management System (BMS) and fusing
A BMS is needed for lithium installs. A pro setup ties the BMS into charge sources and makes sure fuses are sized as close to the battery ends as is fair.
Expect a marked fuse block or breaker at each source and a clear diagram showing fuse ratings and spots. There should also be a note about what to watch for if the BMS cuts out under fault problems.
DC distribution - bus bars, breakers, fuse blocks
DC power layout should be tidy and easy to work on, whether it’s in a Mercedes Sprinter high roof, Ford Transit high roof, or any other build. That means bus bars for common grounds and hots, clearly marked fuse blocks or resettable breakers for circuits, and easy-to-reach wiring runs. Pros route wiring to keep length down, keep hot and return runs paired, and keep high-power runs away from low-power signal wiring.
Inverters and inverter/chargers (pure sine vs modified, integrated charger benefits)
Installers often choose a pure sine inverter for sensitive gear and appliances. An inverter/charger makes shore power hookup easier and can cut down on gear for people who plan to plug in often. The installer should size the inverter to expected peak loads and record startup draws for motors or compressors.
Charge sources - alternator charging, shore power/AC charger, solar + MPPT
A complete pro camper van electrical system has more than one charge source. That often means a smart alternator hookup or DC-DC charger for driving days. It also has a shore power AC charger or Victron inverter charger for plug-in recharge, and a solar array with an MPPT charge controller sized for real-world output (Renogy).
In a well-planned 12v campervan electrical system, installers balance charge settings so batteries receive the right voltage for their type, especially when using LiFePO4 batteries for campervans. The system also automatically picks the best source in the most efficient way.
Shore power inlet, transfer switches, and integration
Shore power must include a proper inlet, AC safety gear (breaker/RCD or GFCI), and a transfer device or relay that prevents power sources from feeding each other. Pros install a marked AC panel with clear breaker ratings, and they write down how the inverter/charger works when shore power is present.
Wiring, install practices, and safety
Wire sizing, color coding, and routing
Pros size wire to the planned steady and peak currents, use trusted copper ampacity tables, and keep runs as short as they can within the full 12v campervan system. The campervan wiring diagram should clearly show wire gauges, routes, and protection so future service is simple, especially around a lithium battery campervan setup. Expect color coding and protective conduit or loom where abrasion is possible, and critical high-current runs secured with tie points and spaced away from heat sources.
Fuse placement and overcurrent protection best practices
Best practice places the fuse at the source, guarding the wire as soon as it leaves the battery or alternator. Pros provide a clear fuse schedule and label each fuse with amp rating and served circuit. Overcurrent protection must also be set up so a single fault does not shut down other systems.
Grounding and bonding in van conversions
Grounding and bonding tie DC negatives and AC earth where it makes sense and follow safe RV habits. A pro will record grounding points, use proper bolts to bare metal, and avoid high-resistance joints that can cause heating under load.
Ventilation, enclosure, and thermal management for batteries and inverters
Battery and inverter boxes must allow for heat to escape. Pros plan airflow and space for heat, especially for lead-acid batteries that can vent gases or for inverters that make heat under steady load. Proper spacing and fire-safe mounting surfaces are standard practice.
System monitoring, controls, and user interface
Battery monitors (shunt-based SOC vs voltage-only)
Shunt-based state-of-charge monitors are the pros’ choice for true remaining battery readings. Voltage-only monitors are cheap but not steady under changing loads. Expect pros to pair a shunt with a clear display or app link so owners can track usable amp-hours and charging behavior.
Remote/system controllers and app integration (Victron, others)
Many pro installs include a central controller or product family for remote watching and setup. App links make it easier to check charge-source status, errors, and past performance without crawling into service compartments.
Load centers, DC lighting circuits, USB/DC distribution
Pros split lighting and low-voltage comfort circuits onto their own guarded panels and supply their own fused USB and 12V circuits for steady performance and easy troubleshooting.
Sizing and specifying a 12V camper setup
Calculating daily amp-hour usage and reserve sizing
Start with a honest daily amp-hour tally for every device, then include reserve days for camping off-grid. Pros often suggest a usable lithium capacity sized to cover planned daily use plus 1-2 days of reserve for normal adventure couples or solo travelers.
Sizing inverter and charger to expected loads
Choose inverter size based on peak appliance draws, keeping in mind motors and compressors spike higher on startup. Pros write down planned steady and surge loads and suggest inverter and charger sizing with easy service in mind.
Solar sizing rules of thumb and realistic output estimates
Pros size solar arrays based on real daily sun and the owner’s area and use habits. Expect close guesses for winter output and honest charge hopes for cloudy weather.
Commissioning, documentation, and serviceability
Essential commissioning tests and checks
- Voltage and current under load for each charge source.
- Function test of BMS disconnects and inverter transfer behavior.
- GFCI/RCD verification on AC circuits and shore power integrity test.
Documentation buyers should receive (wiring diagram, component list, warranty info)
Deliverables should include a marked wiring diagram, a parts list with model numbers, a fuse schedule, and basic problem-solving steps. Pros also provide warranty and service contact details so owners know how to get support.
Ready to trust a pro with your camper van electrical system instead of guessing your way through it? Explore our services or contact us to talk through a system that fits how you really travel.
Maintenance schedule and replacement planning
Pros give a simple care plan: routine terminal checks, BMS/charger firmware checks, and battery health watching. That plan helps owners budget for later battery swaps and routine service.
Common buyer questions and trade-offs
Is lithium worth it for my use?
For steady boondocking and long-term use lithium is often worth the upfront cost because of usable amp-hours and life. For now-and-then weekend use or tight budgets, lead-acid can be a fair short-term choice if the homeowner knows the limits.
Can I run full house AC appliances?
Yes, but running high-draw appliances needs a large inverter and big battery bank and charge sources. Pros will price out the cost and trade-offs and often suggest options like propane or planning for frequent shore power or a generator.
Upgrading an existing system vs full replacement
A focused upgrade (battery swap, better charger, added solar) can extend life and performance, but a full replacement may be easier to service and cleaner long term. Pros lay out both options and clearly show the trade-offs.
Conclusion - checklist for buyers
When checking a pro install, expect a written 12V-first system with a proper-sized battery bank and BMS, clear DC layout, matched charge sources, well-placed fuses, and startup tests. Ask for a wiring diagram, component list, and a short care plan.
If you want a deeper dive on sizing or part choices, see other Vansmith guides like the complete van power guide or our EKKO Lithionics battery upgrade overview. Those walk through real pro service work and record-keeping habits. If you have specific load numbers or a build in progress we can help walk through a sizing checklist.
FAQ
What are the must-have components of a expert camper van electrical system?
A pro system has a proper-sized battery bank (often lithium) and a BMS. It also has DC layout with marked fuses or breakers and bus bars, plus an inverter or inverter/charger.
You should see more than one charge source (solar MPPT, shore charger, alternator hookup) and a shore inlet with AC safety gear. There should also be a solid monitor and proper-sized wiring with fuses at the source.
Do I need lithium batteries or are lead-acid batteries still acceptable?
Lithium batteries give higher usable storage and longer life but cost more up front and need BMS tie-in. Lead-acid can be fine for low-use or budget builds, but expect larger banks and more frequent swaps.
How big should my battery bank and solar array be for boondocking?
Sizing depends on daily amp-hour use. A common pro suggestion for mid-level boondocking is a usable lithium bank sized to meet daily loads plus reserve and 300-600 watts of roof solar as a starting point. Exact numbers should come from a checked load math.