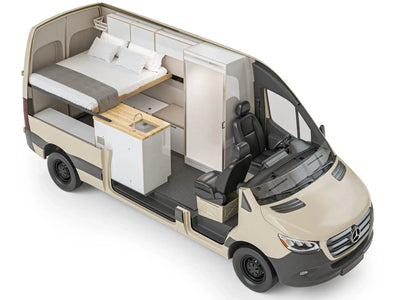
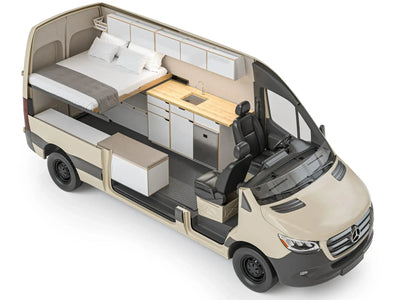
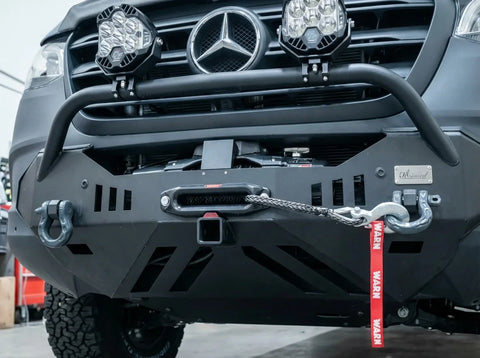
When building a serious overland camper van, few upgrades deliver as much functionality as a rear bumper and hitch system. From the factory, the Mercedes-Benz Sprinter comes equipped with a lightweight rear bumper designed primarily for everyday driving. While it works well on pavement, it offers limited protection when your adventures take you onto rocky trails, forest roads, desert washes, or remote boondocking sites. A heavy-duty rear bumper upgrade provides protection, improves departure angles, creates mounting points for essential gear, and expands your towing and cargo-carrying capabilities. Whether you're shopping for a Sprinter camper van for sale, browsing premium RVs for sale, or planning a custom build through our Sprinter van conversions, a rear bumper and hitch upgrade should be high on your priority list. Many buyers comparing adventure-ready rigs also explore our collection of luxury camper vans for sale and premium Class B camper vans designed specifically for off-grid travel and backcountry exploration.
Why Upgrade Your Sprinter's Rear Bumper?
The rear bumper is one of the most vulnerable areas on any adventure van. When navigating:
- Steep departure angles
- Rocky trails
- Washouts
- Deep ruts
- Backcountry campsites
- Snow-covered roads
the rear of the van is often the first place to make contact with the ground.
A properly designed rear bumper upgrade can:
- Protect the rear chassis
- Improve departure angle
- Support recovery operations
- Carry oversized spare tires
- Mount fuel and water storage
- Support bike racks and cargo carriers
- Provide a stable rear step
For owners investing in premium luxury camper vans, protecting the rear of the vehicle is one of the smartest upgrades available. Rear protection becomes even more important on van conversions with showers, where plumbing systems, tanks, and utility components may extend beneath the vehicle and require additional protection from trail obstacles.
Step 1: Understand the Weight Impact
Before purchasing any bumper system, you need to understand how it affects your van's overall weight. A typical heavy-duty rear bumper can weigh between 120 and 180 pounds before any accessories are added. Once you install:
- Spare tire carriers
- Fuel containers
- Water storage
- Recovery gear
- Storage boxes
- Bike racks
the weight can increase significantly.
The Leverage Effect
Weight mounted behind the rear axle creates additional leverage on the suspension. For example:
- 90-pound spare tire
- Two 40-pound fuel cans
- Cargo box
can place far more stress on the rear suspension than their actual combined weight suggests.
Many overland-focused builds benefit from suspension upgrades to maintain ride quality and prevent rear-end sag. This becomes especially important on heavily equipped winter camper vans carrying additional batteries, water systems, and cold-weather gear. Owners purchasing a Sprinter camper van for sale often underestimate how quickly aftermarket accessories can consume available payload capacity.
Step 2: Verify Your Hitch Requirements
Not all bumper systems are created equal. When evaluating options, verify that the bumper:
- Retains factory towing capacity
- Supports expected tongue weight
- Integrates cleanly with hitch accessories
- Maintains recovery capabilities
If you plan to carry:
- Bike racks
- Cargo trays
- Motorcycle carriers
- Small trailers
your hitch setup must be capable of handling those loads safely. Owners looking at a Class B camper van often underestimate how quickly rear-mounted gear can consume available payload and hitch capacity. The same planning applies when evaluating a Ford Transit camper van for sale for towing and cargo-carrying duties.
Step 3: Choose Your Bumper Material
One of the biggest decisions is selecting the right material.
Steel Rear Bumpers
Steel remains the preferred choice for maximum protection.
Advantages
- Exceptional strength
- Superior impact resistance
- Better recovery capability
- Easily repairable if damaged
- Ideal for rugged terrain
Disadvantages
- Heavy
- Reduces available payload
- May require suspension upgrades
For serious backcountry travel, steel offers unmatched durability.
Aluminum Rear Bumpers
Aluminum provides an alternative for owners focused on weight savings.
Advantages
- Significantly lighter
- Naturally corrosion resistant
- Ideal for humid environments
- Preserves payload capacity
Disadvantages
- Less impact-resistant
- More susceptible to cracking under severe impacts
- Can be more difficult to repair in remote locations
Weight-conscious buyers frequently prioritize lightweight upgrades when designing eco-friendly van conversions that balance capability with efficiency.
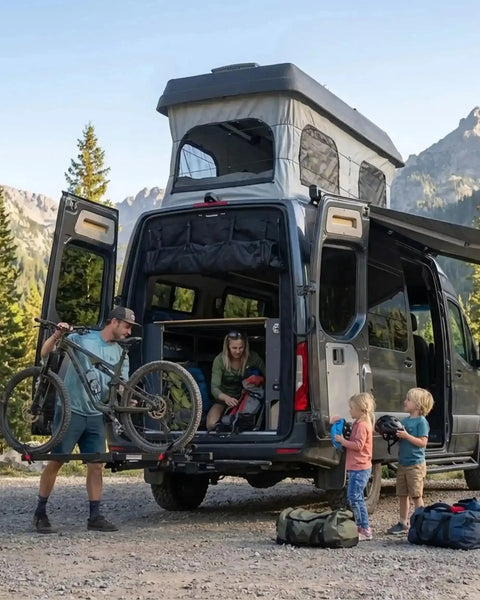
Step 4: Plan Your Swing-Away Layout
One of the biggest advantages of an upgraded rear bumper is the ability to mount gear outside the van. This frees up valuable interior storage space.
Popular Configurations
Spare Tire Carrier: Larger off-road tires often no longer fit in the factory underbody location. A swing-away tire carrier solves this problem while keeping the tire accessible.
Recovery Gear Storage Many owners mount dedicated storage boxes for:
- Recovery straps
- Shackles
- Air compressors
- Tools
- Emergency equipment
Fuel and Water Storage External mounts allow safe transport of additional fuel or water without sacrificing living space. This is particularly useful for extended off-grid adventures in custom family van conversions and expedition-style builds. Couples traveling for extended periods often appreciate the added storage capacity provided by exterior carriers on camper vans for couples.
Step 5: Remove the Factory Rear Bumper
Once you've selected your bumper system, installation begins with removing the factory components.
Tools Required
- Socket set
- Torque wrench
- Floor jack
- Support blocks
- Penetrating oil
- Trim removal tools
Removal Process
- Park on level ground.
- Set the parking brake.
- Disconnect any applicable electrical connections.
- Support the bumper before removing mounting bolts.
- Carefully lower and remove the factory bumper assembly.
- Keep all factory hardware organized during removal.
Step 6: Prepare the Frame Rails
Most heavy-duty bumpers mount directly to the Sprinter frame rails. Before installation:
- Clean dirt and debris
- Inspect for corrosion
- Verify mounting hole alignment
- Ensure adequate clearance around exhaust components
Frame-mounted systems provide significantly greater strength than bumper-mounted alternatives. This is one reason custom Sprinter van conversions designed for off-road travel often prioritize frame-mounted protection systems. Frame-mounted protection systems are also a popular upgrade among owners investing in premium van conversions for sale in Colorado.
Step 7: Relocate Factory Sensors
Modern Sprinters include advanced safety technologies such as:
- Parking sensors
- Backup sensors
- Blind spot monitoring
These systems are frequently housed within the factory bumper assembly.
Important Considerations Sensors must be:
- Properly aligned
- Correctly mounted
- Free from obstruction
- Connected using factory-approved methods
Improper placement can trigger false warnings and compromise system performance. Take extra care when routing sensor wiring around swing-away carriers and storage accessories.
Step 8: Install the New Rear Bumper
With the frame prepared, installation can begin.
General Installation Process
- Position mounting brackets.
- Lift the bumper into place using a helper or floor jack.
- Loosely install all mounting hardware.
- Align the bumper carefully.
- Verify rear door clearance.
- Tighten hardware to manufacturer specifications.
Proper alignment is critical. Rear doors should open fully without interference from swing-away carriers or accessories.
Step 9: Install or Integrate the Hitch Receiver
If your bumper includes an integrated hitch, this step may already be completed.
Hitch Installation Basics
- Align the hitch with frame mounting points.
- Install all supplied hardware.
- Torque bolts according to specifications.
- Verify clearance around the exhaust system.
- Check compatibility with spare tire and accessories.
Most importantly, ensure the hitch mounts directly to the frame—not solely to the bumper. Frame-mounted hitches provide the strength required for towing and recovery operations. Owners browsing a camper van for sale intended for overlanding should always verify how hitch systems are mounted and rated. A properly rated hitch is especially important for owners using their vans as mobile work vans or carrying commercial equipment.
Step 10: Wire Essential Components
Many rear bumper upgrades require electrical modifications. Common additions include:
- License plate relocation lights
- Auxiliary reverse lights
- Scene lighting
- Accessory power connections
If a swing-away tire carrier blocks the factory license plate location, you'll need to relocate the plate and install proper illumination to remain street legal. Many owners integrate additional lighting, battery charging systems, and power management upgrades through a professional camper van electrical system installation.
Step 11: Check Your Departure Angle
One of the biggest benefits of a premium rear bumper is improved departure angle. Departure angle determines how steep an obstacle you can descend without dragging the rear of the van.
Areas Most Likely to Contact
- Hitch receiver
- Recovery points
- Rear bumper corners
- Accessory carriers
Choosing a high-clearance design can dramatically improve off-road capability. This becomes increasingly important for longer wheelbase vans such as those commonly found among Ford Transit van conversions and expedition-focused Sprinter builds.
Common Installation Mistakes to Avoid
Ignoring Payload Capacity Heavy bumpers and accessories reduce available payload. Always calculate total added weight before purchasing components.
Skipping Torque Checks Re-check all hardware after the first 50 miles of driving and periodically thereafter.
Blocking Safety Sensors Misaligned sensors can create constant warning messages and reduce system effectiveness.
Poor Hitch Placement: Low-mounted hitches often become the first component to scrape off-road.
Overloading Swing-Away Carriers: Mount heavy gear as close to the bumper as possible to reduce leverage and stress on mounting components.
Is a Rear Bumper Upgrade Worth It?
For many adventure van owners, the answer is yes. A quality rear bumper and hitch system provides:
- Better protection
- Improved recovery options
- Enhanced cargo capacity
- Greater off-road confidence
- Improved departure angles
- Better support for larger tires
Buyers currently researching a camper van for sale should consider rear protection upgrades early in the build process. For owners exploring remote terrain, the benefits often far outweigh the added weight and cost.
Final Thoughts
A rear bumper upgrade is about far more than appearance. It protects one of the most vulnerable areas of your van while creating valuable mounting space for spare tires, fuel storage, recovery gear, and cargo accessories. When paired with a properly integrated hitch system, it also improves towing capability and expands the overall functionality of your overland setup. Whether you're exploring our inventory of camper vans for sale in Colorado, shopping nationwide through our camper vans for sale in the USA collection, or designing a custom adventure rig, a properly engineered rear bumper and hitch system can significantly improve durability, storage capacity, and off-road confidence.