By Santi — Head Van Engineer — December 9, 2025
Van Life Essentials — Why Power Planning Matters

If you’re planning a build, van life basics start with a clear power plan. Your battery pack, charging setup, and power converter define how far you can roam off‑grid and how reliably your systems run. A good electrical design keeps weight, cost, and freedom in check while keeping safety front and center.
This guide walks through battery type, alternator limits, solar sizing, inverter choice, and wiring basics. It has a short problem‑solving flow so you can make sure choices for a weekend rig or a full‑time build. Expect useful tips and clear tradeoffs — no fluff.
Typical power needs on the road (lighting, fridge, charging devices, AC vs no AC)
Common loads in a 2‑person van: a 12V fridge with a motor (30–60 Wh/hr while running), LED cabin lights (a few Wh/hr), water pump cycles, and phones/laptops (50–150 Wh/day). According to U.S. Department of Energy estimates, typical laptops and small devices can easily add 100+ Wh/day per person when used heavily, so daily use can climb fast once you add a power adapter for 120V gear.
A simple method: guess daily watt‑hours and change to amp‑hours at 12V: Wh ÷ 12 = Ah. For instance, 1,000 Wh/day ≈ 83 Ah/day — we use this worked change in the battery section below.
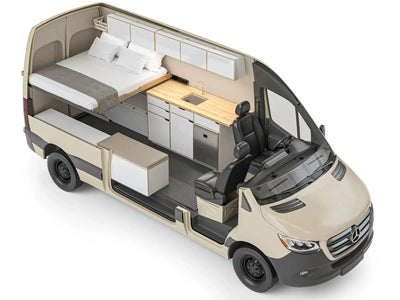
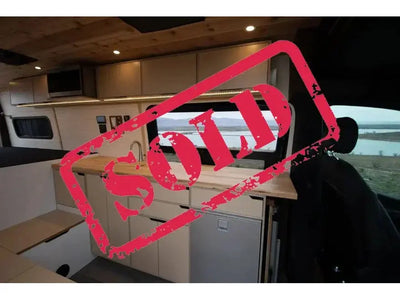
In practice, keep a short log of your real usage for a week. The numbers almost always surprise new builders (in a good way — you learn what to improve first). If you’re still deciding what kind of rig fits your travel style and power needs, it can help to look at real‑world layouts in our camper van build gallery for inspiration.
Trade‑offs: weight, space, cost, and complexity
More battery power gives freedom but costs weight and cash. Lithium (LiFePO4) offers much more usable power per pound than lead‑acid batteries but has higher upfront cost. According to testing summarized by Edmunds on modern vehicle batteries, lithium‑based chemistries generally deliver significantly higher cycle life than traditional lead‑acid when kept within proper temperature and voltage limits.
Solar cuts down alternator use but needs roof space and careful setup. A DC‑DC charger adds cost and hassle yet often pays off in long life and steady charging — especially with lithium systems.
Batteries — Types, Pros/Cons, and Sizing

Battery chemistries explained: Lead‑acid (flooded/AGM/GEL) vs Lithium (LiFePO4)
Lead‑acid (flooded, AGM, GEL) is cheaper but heavier and often capped at ~50% usable DoD for long life. Flooded cells need airflow.
Lithium iron phosphate is lighter, supports 80–90% usable DoD, and gives thousands of cycles with a proper BMS. (MotorTrend)
For full‑time or heavy use we suggest lithium iron phosphate for the usable power and long-term gains. Many folks end up saving money over a few years despite the higher upfront cost. If you’re weighing lithium vs AGM for your build, our camper van battery comparison breaks down the trade‑offs in more detail.
Key specs: capacity (Ah), depth of discharge, C‑rate, cycle life, temperature limits
When choosing cells, check usable Ah at system voltage, steady and peak discharge (C‑rate), rated cycle life at set DoD, and working temp limits. Lithium iron phosphate often needs temp‑aware charging below freezing; some packs include heaters or the charger must limit charging when cold. A quick rule: note the highs and lows you expect (hot/cold) and confirm the battery vendor’s specs for those conditions.
How to size a battery bank — worked example for a 2‑person van
Worked example (moderate usage):
- Fridge: 40 Wh/hr × 24 hr = 960 Wh/day
- Lights & pump: 150 Wh/day
- Phones/laptop: 150 Wh/day
Battery management systems (BMS) and monitoring (SOC, voltage alarms)
A strong BMS is crucial for lithium packs (cell balance, over/under‑voltage, temp cutoffs). Add tracking (SOC, voltage, current logs)—this is the single most useful habit to extend battery life and avoid surprises. If you’re curious about upgrade paths, see our EKKO Lithionics battery upgrade case study for a real‑world example of improving on‑vehicle power and tracking: EKKO Lithionics battery upgrade.
Charging Sources — Alternator, Shore Power, and Solar

Alternator charging basics — what the vehicle alternator can and can’t do
Generators are handy but rarely provide the step‑by‑step, chemistry‑aware charging that a healthy campervan electrical system needs. Bulk charging a large lithium house battery bank straight from a generator can overheat the unit. It can also leave lithium iron phosphate cells undercharged compared to a well‑designed setup with shore power or solar panels for van use.
For reliable alternator charging, use a DC‑DC charger or a smart separator to manage voltage and protect both starter and house batteries. According to NHTSA vehicle safety guidance, keeping the starting system protected and avoiding overloads on factory wiring is an important part of safe vehicle modifications. I've seen weekend rigs work fine with a simple separator, but long‑term or heavy use almost always gains from a DC‑DC setup.
When to use a DC‑DC charger vs direct alternator connection (voltage regulation, multi‑battery systems)
Choose a DC‑DC charger if you have a large house bank, lithium iron phosphate type, or want best charging while driving. DC‑DC units handle alternator voltage changes, provide correct charge setups, and keep the starter battery separate.
For light weekend setups with a small lead battery, a separator might work short‑term, but DC‑DC is the safer long‑term choice. We install and service DC‑DC systems as part of our electrical packages—book a consult if you want a systems review: Book a consult.
Shore power and converter/charger selection (smart chargers, multi‑stage charging)
When plugged in, use a multi‑stage charger with a setup that matches your battery type (lithium iron phosphate‑ready or chosen setups). Match charger amps to the battery bank size—30–60 A chargers are common for vans.
If mixing shore, gen, and solar, make sure each source is set up so they don’t fight each other. A short checklist: check setups, set right float volts, and stagger sources if needed.
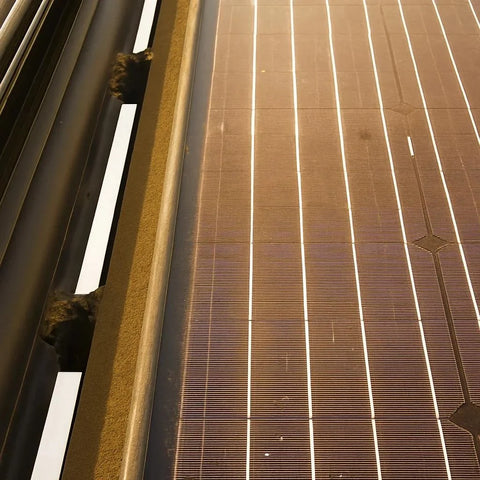
Solar basics for vans — panels, charge controllers (PWM vs MPPT), realistic production estimates
MPPT charge controllers are better than PWM, mainly in tough light or cold situations. A 400 W roof array can produce 1,600–2,000 Wh/day under best conditions, but output changes with the season and place. According to U.S. Department of Energy solar PV guidance, real‑world production is strongly affected by shading, tilt, and temperature, so it’s smart to size with a margin.
For good van battery charging and knowing your campervan electric system, refer to our sizing guide: How much solar do I need for van life? and explore our clear system guide at How to power your van: solar, batteries & electric explained.
Inverters & AC Power — Choosing the Right Unit
Pure sine vs modified sine: which to use for sensitive electronics
Pure sine converters are the best choice. They run sensitive gear, chargers, and motors smoothly.
Changed sine converters can work for simple resistive loads but may add noise or cause certain gear to act poorly. For reliable use and fewer problems, pick a pure sine converter sized for your planned steady and surge loads.
Continuous vs surge rating; sizing for common appliances (kettle, microwave, hair dryer)
Match converter steady rating to your running loads and ensure the surge rating covers motor starts. Kettles and hair dryers are high draw (1,500–2,500 W) and often require shore power or a very strong converter plus a large battery/charging system. Many Vansmith builds use 300–1,000 W converters based on planned AC use.
Installation considerations: placement, ventilation, remote panel, and safety interlocks
Mount converters where airflow is enough and keep DC runs short. Use a remote on/off panel and install a transfer switch or lock if you’ll combine shore and converter power. Always fuse the battery positive within a few inches of the terminal.
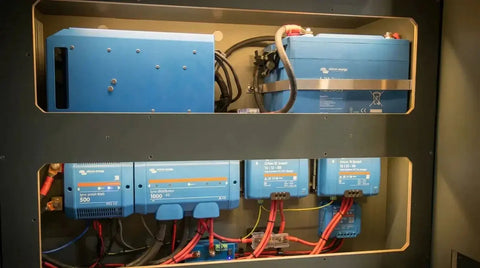
Wiring, Fusing & System Layout — How Components Connect
Block diagram: alternator -> DC‑DC/isolator -> house battery -> inverter/loads/charger/solar
System flow: alternator → DC‑DC charger/isolator → house battery. Solar → MPPT → house battery.
Shore → AC charger → house battery. Inverter draws from house battery and feeds AC loads.
This layered approach protects the starter system and keeps charging predictable.
Cable sizing basics, voltage drop, and choosing the right fuse/breaker
Use a voltage drop tool and wiring charts for gauge choice. As a quick guide, 50 A short runs often use 6 AWG; longer runs need thicker cable.
Fuse at the battery positive end with the fuse rated just above planned steady current but below the cable’s max rating. Place fuses within inches of the battery for safety.
Grounding and common mistakes to avoid
Follow converter and charger maker grounding advice. Avoid small cable, fuses placed far from the battery, poor crimping, and mixed charger setups without isolation. Use proper lugs, heat‑shrink, and rust protection on ends.
Safety, Maintenance & Troubleshooting
Battery safety: ventilation, mounting, spill containment (for flooded), thermal protection
Secure batteries with straps and racks. Flooded cells need airflow and spill control. Lithium iron phosphate needs a BMS and thought for cold spots—either a heated box or chargers that stop charging below safe heat levels.
Fire prevention: fuses, breakers, correct wiring practices, and smoke/CO detector placement
Fuse on the positive side at the battery. Use correctly rated breakers into converters and keep wiring neat and held up. Install smoke and CO alarms in the living area and test them often. The National Fire Protection Association recommends CO alarms near sleeping areas and regular testing, which applies directly to compact van interiors.
Routine maintenance checklist (battery health, connections, charge profiles)
Inspect ends and lugs for rust, tighten per spec, check SOC and charger logs, and ensure charger setups match battery type. Check gen and DC‑DC work under load from time to time.
Quick troubleshooting flow: no charging from alternator, inverter tripping, rapid battery drain
No alternator charge: check DC‑DC/separator fuse, alternator output, and wiring. Converter trips: check surge loads and battery voltage under load.
Rapid drain: log Wh use, split loads, and look for hidden draws like always‑on controls or a fridge running due to thermostat faults. A small meter and a habit of logging symptoms will save hours and often point you to the easy fixes first.
Component & Parts Checklist (Campervan Supplies)
Recommended components by use‑case (weekend van, off‑grid full‑timer)
Weekend: 100–200 Ah house battery (AGM or small lithium iron phosphate), 200–400 W solar, 300–500 W pure sine converter, basic DC‑DC or separator. Full‑timer: 200–600 Ah lithium iron phosphate bank, 400–800 W+ solar, 30–60 A MPPT, 30–60 A DC‑DC, 1,000 W pure sine converter or larger based on AC needs.
For expert help on your van's power setup, explore our services and ensure your campervan electric system is ready for any trip. If you’re starting from scratch and want a professionally designed layout with a dialed‑in electrical system, our custom van conversion services can handle everything from batteries to solar and inverters.
Example part specs: LiFePO4 100Ah, 300–1000W pure sine inverter, 30–60A DC‑DC charger, MPPT 30A
Common parts: 100 Ah lithium iron phosphate units and MPPT charge controllers in the 30–100 A range. You’ll also see 30–60 A DC‑DC chargers, 2–4 AWG battery‑to‑converter cable for high current, and ANL/MCB fuses sized correctly.
Tools and supplies for installation: test meter, crimper, heat‑shrink, ANL/MCB fuses, cable lugs
Bring a good meter, crimper, heat‑shrink, torque wrench, and spare fuses. If you plan to DIY, follow best steps or ask an expert for high‑power systems; The Vansmith offers setup and troubleshooting help, and you can always contact our team if you get stuck mid‑install.
Ready to scope your build?
Book a consultFrequently asked questions
How much battery capacity do I need for van life?
Guess daily watt‑hours (Wh), change to amp‑hours at 12V (Wh ÷ 12 = Ah), and add margin. Lead battery: avoid >50% DoD; lithium iron phosphate: 80–90% usable DoD. For instance, 1,000 Wh/day ≈ 83 Ah/day. A 100 Ah lithium iron phosphate covers about 1 day. A lead battery bank would need about 200 Ah to give the same usable power.
Can I charge my house batteries from the alternator?
Yes, but alternator charging has limits. Many alternators lack multi‑stage charging and can get too hot if fast‑charging a large house bank. Use a DC‑DC charger or smart separator to control voltage and protect batteries — especially lithium iron phosphate.
Do I need a pure sine inverter for a campervan?
Pure sine is best for sensitive gear and modern chargers. Changed sine can run simple resistive loads but may cause problems with motors, microwaves, or battery chargers.
How do I keep my battery safe and extend its life?
Use correct charging setups and avoid extreme temps. Firmly mount and air batteries (flooded types). Use a proper BMS for lithium, fuse positive runs close to the battery, and check SOC often.
What fuse sizes and cable thickness should I use?
Sizes depend on current and run length. Use voltage‑drop calculators and wiring tables.
As a quick guide, 50 A short runs often use 6 AWG; larger currents need thicker cable. Fuse near the battery and size to protect the cable and gear.
Can solar replace alternator charging?
Solar can greatly cut down alternator reliance but depends on panel area, weather, and use. A mixed approach (solar + DC‑DC + enough battery) is often the most reliable. For more on solar sizing and real output, see our guide linked earlier.
Further reading and tools: check our system guide and solar sizing guide linked above. If you'd like a pro to review your planned electrical setup or a quote for a complete van power system, book a consult with our team, or browse our latest builds in the van conversion gallery to see how different power systems look in finished rigs.