Whether you're building a travel van with a bathroom for full-time van life or weekend adventures, the layout decisions below apply to all Sprinter wheelbases. Choosing the right bathroom setup affects everything from water storage and ventilation to interior living space, making it one of the most important design decisions in any camper van conversion. Explore our camper vans for sale.
Why put a bathroom in a Sprinter van?


Adding a bathroom changes how you use your van. For a Sprinter van with a bathroom, it is about ease and a warm rinse after a long day. For full-time couples or families it is freedom from campgrounds and a real life upgrade.
At The Vansmith, we see about 90 percent of buyers choose a high roof when a bathroom is in the plan. The extra headroom makes privacy, plumbing runs, and a usable shower much easier. I have talked with buyers who say a simple cassette toilet made weekend trips feel very different.
This guide looks at practical layouts, tank math, venting to control smells and moisture, and a simple upkeep schedule so your bathroom stays dependable on the road.
Use cases and priorities (weekend versus full time)
Decide your main goals first. Weekend travelers tend to favor a small cassette or easy-to-move option to save weight and payload. Couples or full-time users often accept the extra weight and difficulty of fixed tanks and a wet bath to gain freedom.
Parents will value simple-to-clean surfaces, strong fittings, and shorter step-in thresholds for kids. Keep weight and balance impacts in mind when choosing tank sizes and spots.
If you are testing ideas, start with a lightweight cassette setup and iterate from there.
Design constraints: length, roof height, and payload
Wheelbase makes a big impact. Short-wheelbase Sprinters (144 in) limit footprint (Mercedes Sprinter) and often need tiny wet baths or cassette options. Long-wheelbase Sprinters (170 in and larger) can fit a full wet bath plus storage or a closet.
High roof is the best setup for bathrooms because it gives usable standing space and makes venting runs easier. Always figure added weight: cassette-based installs can add about 30 to 80 lb.
Full wet-bath builds with fixed tanks and heater parts often add 150 to 400 lb or more based on materials and tank sizes. Compare that against your van's payload before finishing the plan.
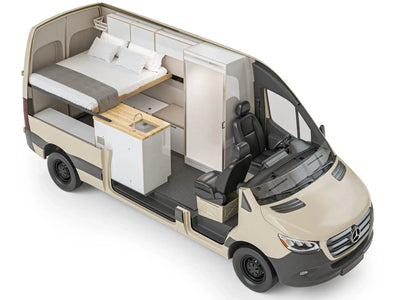
Sprinter Camper Van Bathroom Floor Plans: 144 vs 170 Wheelbase
Bathroom placement has a major impact on the overall functionality of a Sprinter camper van. The ideal floor plan depends on whether you're building on a 144-inch wheelbase or a 170-inch wheelbase platform.
144-Inch Sprinter Floor Plan
A 144-inch Sprinter requires efficient use of every square foot. Most builders place the bathroom directly behind the driver or passenger seat to maximize rear cargo and sleeping space. A compact wet bath measuring approximately 24" × 30" provides enough room for a toilet and shower without overwhelming the interior.
On a 144" Sprinter with a shower, a 24" × 30" shower footprint is achievable in the rear section while still leaving room for a galley kitchen, convertible dinette, and sleeping area. This layout works well for couples and weekend travelers who want self-contained bathroom functionality without moving to a larger wheelbase.
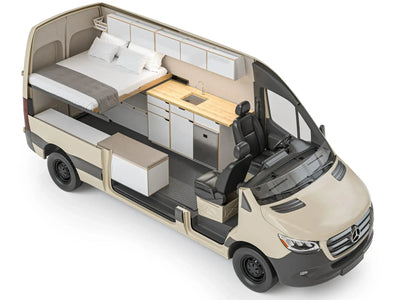
170-Inch Sprinter Floor Plan
A 170-inch wheelbase offers substantially more flexibility. Builders can create larger wet baths or even separate dry bath layouts. A bathroom footprint of 30" × 36" is common, and some luxury builds include dedicated shower stalls, vanity storage, and larger water tanks.
With additional interior length, the bathroom can be positioned mid-van without compromising the kitchen or sleeping space. This makes the 170 one of the most popular choices for full-time van life.
For additional layout inspiration, see our full floor plan guide: Floor Plan Ideas for Sprinter Camper Van with Bathroom.
Bathroom types and tradeoffs
Wet bath (combined shower and toilet): space needs and privacy options
Wet baths combine shower, toilet, and sometimes sink within a single waterproof base. A good wet-bath size in a long-wheelbase high-roof Sprinter is 24 to 30 inches by 48 to 60 inches based on layout.
Wet baths save space and make plumbing easier but need smart material choices for waterproofing, strong drainage, and fan spots for quick drying. In our builds we often use simple-to-clean wall panels and a removable floor grate to speed drying and upkeep.
Dry bath (separate shower and toilet): when it works in a Sprinter
Dry baths need more floor space and are most practical in long-wheelbase layouts or when the bathroom is offset into a mid-cab or rear area. Dry baths improve comfort and reduce moisture transfer to cabinets but increase weight and difficulty of plumbing and tank runs.
Cassette toilet and portable solutions: pros, cons, and cassette dimensions
Cassette toilets are light, easy to fit in (RVIA), and keep waste handling simple. Normal cassette sizes range from about 2 to 5 gallons. The removable cassette itself often sits behind a small access door for dumping.
Pros include low starting cost and simple upkeep. Cons are small size and more frequent dumping.
Cassette toilets are a great choice for weekend travelers, couples who return to dump stations every few days, or setups where fixed black tanks are not practical. If you're comparing different systems, explore our guide to Best Camper Van Toilet & Bathroom Options With Pros & Cons for a detailed breakdown of cassette, composting, portable, and fixed toilet solutions.
Marine/RV-style built-in toilets (macerator and gravity flush)
Built-in toilets offer combined holding tanks and a more lasting setup. Macerator pumps allow a toilet to discharge to remote holding tanks but need power and regular upkeep. Gravity-flush systems are simpler but need careful slope and venting to work well in a van's small space.
Composting toilets: benefits and limitations for vanlife
Compost toilets reduce water and waste handling. They are low-smell when sized and vented right, but need space for dividing and a care routine. Compost systems can be a great fit for off-grid travelers who focus on saving water and low dumping frequency, but they add bulk and need user learning to work well.
Real layouts: floor plans and dimensions
Short-wheelbase example (144 in): micro wet bath layout
In a 144 in wheelbase Sprinter you will often target a 24 in by 48 in micro wet bath. Use a folding sink and a shower curtain or folding divider to make the most of usable space.
Think about a cassette toilet or a turning seat for dual use. Keep plumbing runs short and place tanks under seating or in shallow units to save cabin space.
Long-wheelbase example (170 in): full wet bath plus closet
With a 170 in wheelbase and high roof you can fit a 30 in by 60 in wet bath, a small closet, and tank storage under the floor or bench. This size supports a standard RV-style toilet or a compact macerator setup. Focus on access panels for the black and gray tanks and plan tank vents to exit above the roof line.
Rear wet bath versus mid-cab wet bath: circulation and sleeping-area tradeoffs
Rear wet baths make plumbing easier but can reduce usable storage at the back of the van and limit rear door access. Mid-cab bathrooms group systems and can improve weight balance, but they need longer plumbing runs and careful routing to avoid freezing in cold weather.
Layout tips: swing doors, pocket doors, fold-away fixtures, and shower curtains
Favor pocket doors or sliding doors to save swing room. Fold-up fittings and swing-out faucets increase function in small footprints.
A detachable or folding shower pan can protect floors while keeping the install light. Use strong seals and simple-access service panels for pumps and valves.
Tank sizing and plumbing basics
Definitions: fresh, gray, and black tanks; cassette capacity vs fixed tanks
Fresh tank stores drinkable water, while the gray tank collects sink and shower waste and the black tank holds toilet waste unless you use a detachable cassette. When planning a sprinter interior layout or a full sprinter van conversion interior, size and placement of these tanks will drive how long you can stay off-grid and where plumbing runs can realistically go.
Cassette sizes are often listed in gallons and are smaller than fixed tanks. Fixed black tanks in van builds vary widely but are often 5 to 15 gallons for small designs and larger for longer independence.
Simple sizing formula with examples
Start by using a clear starting point: daily water use per person times days of freedom plus a safety margin.
- Daily water use guideline: 5 to 10 gallons per person per day for basic needs including short showers and sink use. Use the lower end for water-conservative setups and the higher end for more comfortable showers and dishwashing.
- Example 1: Solo weekend (1 person, 2 days) assuming 7 gallons/day: 7 × 2 = 14 gallons fresh. Gray tank sized similarly; cassette toilet or small black tank for solids.
- Example 2: Two people weeklong (2 people, 7 days) at 7 gallons/day: 7 × 2 × 7 = 98 gallons fresh. For practicality most full-timers choose to carry 20 to 60 gallons fresh and plan regular water resupply; a 98-gallon fresh capacity is rare in a van build because of weight and space constraints.
- Example 3: Full-time couple aiming for 3 days of autonomy: 2 people × 7 gallons × 3 days = 42 gallons fresh. Combine with a 20 to 30 gallon gray tank and either a cassette or 10 to 15 gallon fixed black tank depending on toilet choice.
Always think about the weight impact on your van's payload when planning a bathroom van build. Water weighs about 8.34 lb per gallon, meaning a 40-gallon fresh tank adds about 334 lb before figuring in plumbing and mounting hardware. This is a key factor in planning your van with shower setup for a smooth van life bathroom journey.
Toilet choices and downstream plumbing needs
Cassette toilets need simple access for the cassette removal and a vent for the cassette space. Macerator toilets need a 12V pump and power to run it.
Gravity systems need slope in the drain and are simpler with power but may not work in every layout. Compost systems remove waste handling but need air flow and regular upkeep.
Graywater handling: tank locations, venting, and drain options
Gray tanks are often placed under benches or beds, low in the van to use gravity drainage. Venting gray tanks above roof level and adding easy-to-reach drain points makes dumping and upkeep easier.
Based on local rules you may route gray water to set dump stations. Never dump black water on the ground.
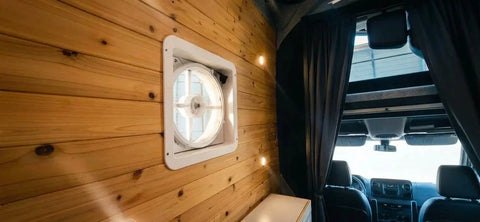
Ventilation, odors, and moisture control
Fan placement and airflow patterns for bathrooms
Place a separate vent fan in or right next to the bathroom if you have a wet bath. The goal is to move moist air out quickly to prevent mold.
Use a roof vent near the shower and place the main house fan to pull fresh air through the living space when the bathroom fan is running. Run the bathroom fan on high during and for a few minutes after a shower.
Dedicated bathroom vents versus house fan strategies
A separate bathroom vent with a short, direct path to the roof is the best way for odor and moisture control. If a separate vent is not doable, use the house fan and door control to create cross-flow air movement, along with frequent squeegeeing of surfaces and quick-dry finishes.
Anti-siphon and venting for black and gray tanks
Black and gray tanks must be vented above roof level and include anti-siphon loops as needed to prevent unwanted draining or backflow. For cassette toilets include charcoal vent filters to reduce odors at the vent cap.
Mold prevention: materials, finishes, and drying workflows
Use solid, simple-to-clean materials for walls and floors. After showers squeegee walls and run the fan to reduce drying time.
Open doors or windows when weather permits. Regular checks of seals and caulk help catch leaks before mold grows.
Systems, components, and controls
Water pumps and plumbing fittings to prefer
Choose a dependable 12V demand pump or a diaphragm pump with built-in pressure switch. Use strong fittings, PEX or tough flexible hose where needed, and easy-to-reach shutoff valves. Avoid thin plastic fittings in high-stress spots.
Heated showers and hot water options
Instant propane or diesel heaters give the best hot-water setup with small tankless units. Small tank-style heaters save starting cost but add weight and standing water risks. Balance power supply, fuel source, and how often you need hot water.
Toilet hardware, macerator pumps, and venting
When using macerators, allow for easy access to service points and include inline strainer or filter housings. For cassette toilets design an access door that allows removal and cleaning without disturbing inside finishes. Seal quality and ease of service are more important than a small weight savings.
Sensors, tank gauges, and monitoring best practices
Install solid or float sensors with a known setting. Access panels for manual checks are helpful. Watch fresh, gray, and black levels often and keep a simple log while you learn your system's real-world use rates.
Electrical and fuel considerations
Account for power draws from macerators, pumps, and tank heaters. If using instant hot-water or water systems, include fuel and venting needs. Size batteries and alternator power so that running a macerator and fan is reliably possible while boondocking.
Maintenance chores: schedule and how-to
Daily and after-use tasks
Rinse the shower and sink areas, squeegee wet walls, run the bathroom fan after use, and empty movable cassettes as needed.
Weekly tasks
Empty gray tanks and cassette tanks, add suitable tank treatments for odor control, inspect seals and toilet gaskets, and check pump strainer screens.
Monthly tasks
Deep clean tanks and lines, inspect vent caps and filters, test sensors, and inspect hoses for wear or chafing. Replace worn seals promptly to prevent odors and leaks.
Seasonal and winterizing steps
Drain all tanks and water lines before cold weather. Blow out lines with air and use RV antifreeze in traps and detachable parts.
Remove the cassette if storage is planned. Tank heaters or insulation will reduce freezing risk, but planning and doing are key for cold areas.
Troubleshooting common problems
Odor: verify venting, check gaskets, and ensure routine cassette emptying. Slow drains: inspect shower drain, venting, and macerator blade if present. Sensor errors: adjust or test floats and wiring links.
Weight, payload, and installation considerations
Estimate of typical added weight
Cassette toilet installs often add 30 to 80 lb. Full wet-bath builds with fixed tanks, shower base, and heater typically add 150 to 400 lb.
Water weight itself is important at 8.34 lb per gallon and must be part of payload calculations. Place tanks low and near the van center where you can to keep handling and balance.
Mounting points and center of gravity
Secure tanks to the van structure with rated straps and think about inside bracing for heavy parts. Place heavy items low and central. Account for changing loads during driving and off-road use.
Ready to transform your Sprinter into the best van with a bathroom? Explore our services to start your journey today.
Insulation and soundproofing choices
Cover tank bays and run thermal breaks where pipes pass through bare panels. Use soundproofing around pumps and macerators to reduce noise.
Conversion Van Bathroom Options Beyond the Sprinter
While Sprinter vans dominate the premium camper van market, they're not the only option for travelers who want a conversion van with bathroom facilities.
A conversion van with a bathroom can also be built on platforms such as the Ford Transit and Ram ProMaster. The Ford Transit offers multiple roof heights and wheelbase lengths, making it a strong competitor for bathroom-equipped camper builds. The ProMaster's wider body allows for creative layouts that can accommodate transverse beds while still leaving room for a compact bathroom.
When planning a van with a bathroom, the same principles apply regardless of platform: efficient tank placement, adequate ventilation, waterproof wall systems, and realistic space expectations. While Sprinter vans often provide the highest resale value, Transit and ProMaster conversions can deliver similar bathroom functionality at a lower initial investment.
Ultimately, the best conversion van with bathroom depends on your travel style, budget, and desired interior layout.
Component and material recommendations
Compact fixtures and space-saving hardware
Fold-down sinks, swivel faucets, and thin shower pans make the most of usable space. Use rust-proof materials and stainless or good plastic fittings for long life.
Recommended fans, vent caps, and macerator models
Choose roof vents rated for RV use and strong fan motors with easy-to-fix blades. When picking macerators, choose models with a proven track record and clear service steps. For odor control, choose vent caps with charcoal or carbon filters where cassette vents end in compartments.
Plumbing fittings and hose types that hold up in vans
Prefer PEX, strong flexible hose, or boat-rated hoses and avoid brittle plastics. Use strong hose clamps and easy-to-reach unions for easy service.
Cleaning products and tank additives we recommend
Use enzyme-based tank treatments and gentle cleaners for surfaces. Avoid home bleach in tanks as it can damage seals and sensors. Follow maker's advice for treatments used with cassette systems and macerators.
Sample build timelines and cost estimates
Quick cassette-based retrofit: parts list, effort, and cost
Cassette upgrades are the fastest and most budget-friendly route. Expect parts and labor in a modest range and build time counted in days rather than weeks. They are ideal for weekend users and lightweight builds.
Full wet-bath conversion: timeline and labor estimate
Full wet-bath builds usually take weeks and involve frame work, tank mounting, plumbing runs, and finish work. Expect higher parts and labor costs. Plan for checks and service access points during the design phase.
DIY versus pro conversion checklist
DIY is doable for cassette setups and simple gray-water routing. For fixed tanks, macerators, and heater installs, we suggest expert help or advice. The Vansmith offers build services that include proper tank mounting, vent routing, and winterization options when you want a ready-to-go, tested system.
Shower and Toilet in the Same Space: Wet Bath vs Separate Fixtures
A Sprinter van with a shower and toilet typically uses one of two approaches: a wet bath or a separated dry bath.
A wet bath combines the toilet, shower, and often a compact sink inside a single waterproof enclosure. Because all surfaces are designed to get wet, this arrangement maximizes space efficiency and is the most common solution in 144-inch wheelbase vans.
A dry bath separates the toilet area from the shower compartment. This keeps the toilet area dry after showering and offers a more residential experience. However, dry baths require significantly more floor space and are generally reserved for 170-inch wheelbase builds.
For most travelers, a wet bath provides the best balance of comfort, functionality, and efficient space utilization.
Regulatory and disposal notes
Local rules overview: gray and black water disposal best practices
Never dump black water on the ground. Use set dump stations, RV parks, or suitable city facilities.
Gray water rules vary; in many areas dumping near rivers or on public land is not allowed. Respect local rules and carry a cleaning kit for proper disposal.
Cassette dumping etiquette and legalities
Dump cassettes only at allowed dump stations. Rinse the cassette away from natural water sources and use safe cleaning products. Keep an eye on size so you do not overflow when driving remote routes.
Safe wastewater disposal while boondocking
Plan water refills and dumping stops. Use low-water showers, solar gray-water drying methods when right and legal, and reduce gray-water amount when boondocking in sensitive areas.
Need a layout review? Book a free consult with The Vansmith design team to review bathroom layouts, tank sizing, and payload effects for your Sprinter. Contact us to get started, or explore our floor plan ideas for a Sprinter camper van with a bathroom for inspiration.
Ready to Build?
The Duo Series starts at $45k and includes a wet bath option, making it a practical choice for travelers seeking a fully equipped bathroom setup without sacrificing living space.
FAQ
How much black and gray water tank capacity do I need for a Sprinter bathroom?
Guess daily water use per person and toilet flush water if using a built-in toilet. A common rule is 5 to 10 gallons fresh water per person per day.
Size gray tanks for daily use times days of freedom plus a safety margin. Cassette black tanks are usually 2 to 5 gallons.
Fixed black tanks usually range 5 to 15 gallons based on the toilet and planned freedom. Use worked examples in the body above to compare situations.
Can I fit a full shower in a Sprinter van and what layout works best?
Yes. In a high-roof long-wheelbase Sprinter a full wet bath with a 24 to 30 inch footprint can fit. Short-wheelbase vans need tiny wet baths or rear showers with curtains and fold-up fittings. Choose layout based on available floor plan and roof height.
Should I use a cassette toilet, macerator, or composting toilet?
Cassette toilets are easy to fit and are low weight with frequent dumping. Macerators allow remote fixed tanks but need power and upkeep.
Compost toilets cut water use and dumping but need space and careful upkeep. Choose based on freedom needs, dumping access, weight limits, and personal comfort with upkeep routines.
How do I vent a black tank and prevent odors in a van bathroom?
Vent both black and gray tanks above the roof line and include anti-siphon loops. Use charcoal vent filters for cassette areas and run a separate bathroom fan during and after showers. Tight seals, regular emptying, and tank-cleaning treatments reduce odors over time.
What maintenance does a van bathroom require and how often?
Daily: rinse, squeegee, and air out. Weekly: empty cassettes and gray tanks, check seals and add tank treatments.
Monthly: deep clean tanks and test sensors. Each season: prepare for winter by draining lines and adding RV antifreeze where needed.
Follow component manufacturer guidance for pumps and heaters.
Do Sprinter Vans Come With Bathrooms?
No. Factory Sprinter vans do not include bathrooms. Bathroom systems are added during the conversion process. Common options include cassette toilets, compact wet baths, and larger dry bath setups.
How Much Water Does a Sprinter Van Shower Use?
Most low-flow van showers use 3–5 gallons during a five-minute shower. Weekend travelers typically need 15–20 gallons of fresh water, while longer trips often require 30–40 gallons.
Can a 144-Inch Sprinter Fit a Shower?
Yes. A 24" × 30" wet bath can fit inside a 144-inch Sprinter while still leaving room for essential living space.
What Is the Difference Between a Wet Bath and a Dry Bath?
A wet bath combines the shower and toilet in one waterproof enclosure. A dry bath separates them, offering more comfort but requiring additional space.
What Ventilation Does a Van Bathroom Need?
A roof vent fan rated at 110+ CFM is recommended. Running the fan after each shower helps control moisture and prevent mold.